


Inside Nunn Design
Rainbow Jewelry – Celebrate Pride and DIY!
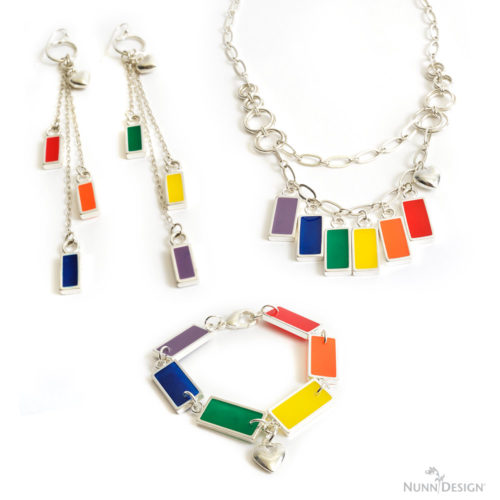
I was thrilled to see Cheryl creating these pieces of rainbow pride jewelry during our most recent Art Day.
“As art day approached, I had been pondering options that would fit Becky’s request for designing jewelry for a specific audience. When I saw the visuals of the news events come across my Facebook feed of the tragic event in Orlando, Florida, I knew I wanted to do something that captured rainbow pride to show my support of the victims and their families.” – Cheryl
Be Inspired!
![]()
![]()
![]()
![]()
![]()
Learn How!
All of the pieces in Cheryl’s collection involved mixing and colorizing Nunn Design 2-Part Resin and pouring the colorized resin into Open Back Bezels. Here is a tutorial on that technique.
Materials Needed:
Nunn Design 2 Part Resin
Castin’ Crafts Colorants
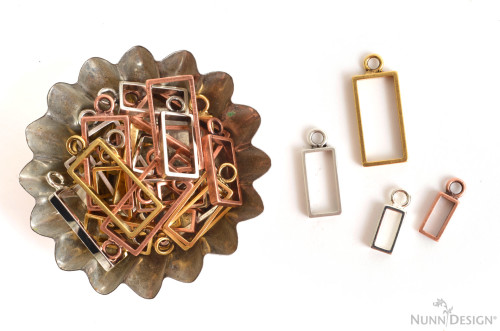
Open Frame Rectangles
Others:
Packing Tape
Wet-wipes
Toothpick or headpin
Scissors
Step 1:
Cut several pieces of packing tape and place it on your work surface. Place your Open Frame Rectangles onto the tape. Press down and rub your bezel back and forth on your work surface, burnishing the tape onto the backside of the bezel. Trim away any excess of the packing tape to avoid it from getting attached to anything while you are pouring or letting your piece cure.
Tip: Check to see that your packing tape is clear and there is no residue or mottling in the adhesive. If there is, it will show up in your finished resin piece when you remove the tape once the resin is cured. Try to use an area of the tape that does not have blotches or marks.
Step 2:
Read the resin instructions for safety concerns regarding the Nunn Design Resin.
When I work with resin, I always:
- Place a large plastic bag over my work surface and tape it down.
- I make sure I have ventilation in my workroom.
- I wear gloves.
- I wear glasses (readers because I can’t see anymore. Plus it protects my eyes!).
- I have a pile of wet wipes handy.
- This is a great blog post that covers 20 Habits for Successfully Using Nunn Design 2-Part Epoxy Resin. Even if you are a seasoned resin mixer, this might be worth a read.
- You can also watch this great video on How to Mix Nunn Design Resin
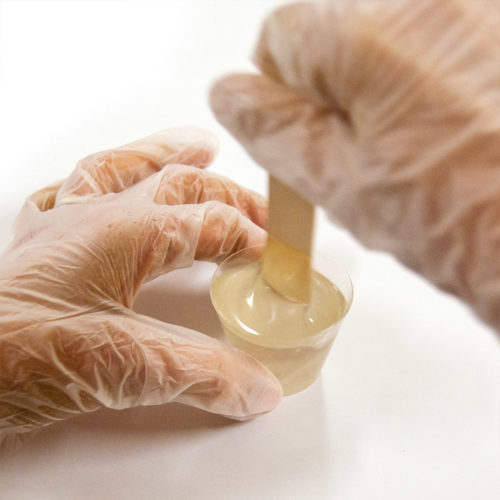
Step 3:
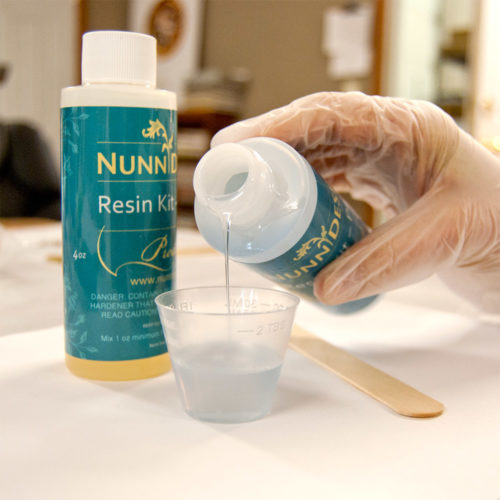
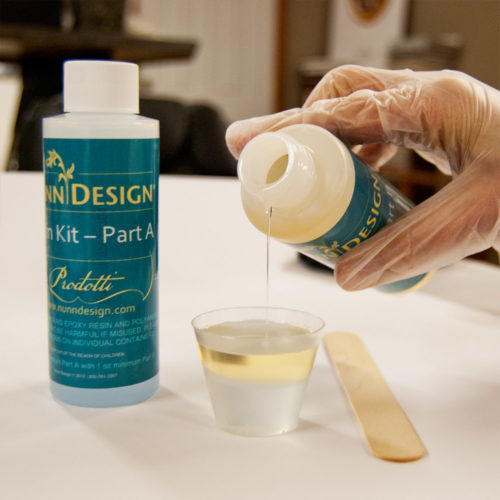
Place one cup (included in the Nunn Design Resin Kit) onto your table. For curing purposes, it is very important that the resin be an exact 1 to 1 ratio of Part A and Part B. I suggest getting your eyes level with the resin so you can see the lines on the measuring cup. Pour Part A of your resin kit up to the ½ fluid ounce mark on your measuring cup. Pour Part B of your resin kit into the same cup until it is filled to the 1 fluid ounce mark. It is important to pour Part A first and then Part B. It is some chemical thing about the part B being heavier or something.
Step 4:
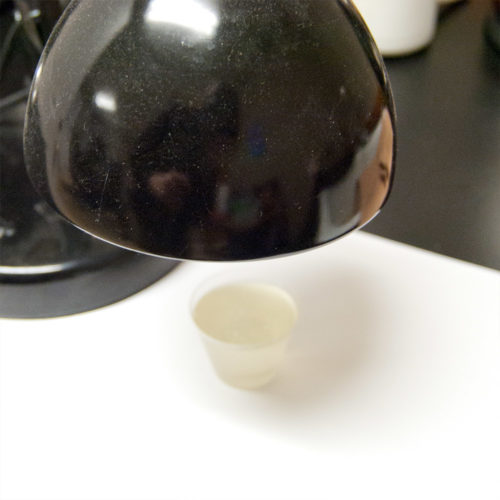
Set your timer for 2 minutes. Using the stir stick from your kit (a popsicle stick or coffee stir stick will work great too), slowly and carefully stir your resin scraping the sides as you stir. Stir for the full 2 minutes. Set the mixture under a warm lamp for 5 minutes. I like the lamps with the adjustable arms that can get right down next to the resin. This aids the air bubbles in the resin to rise to the surface and pop.
Step 5:
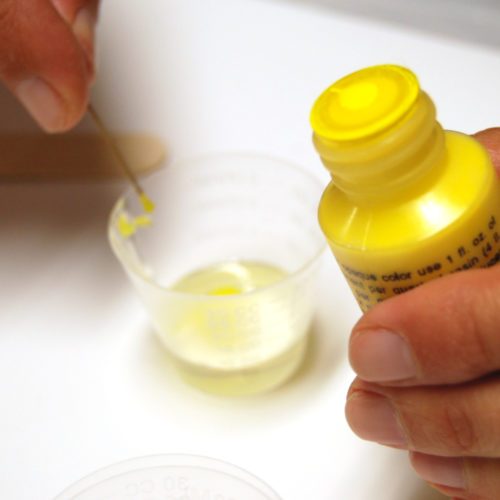
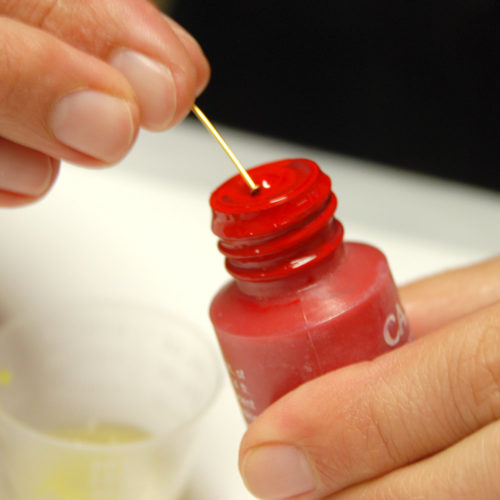
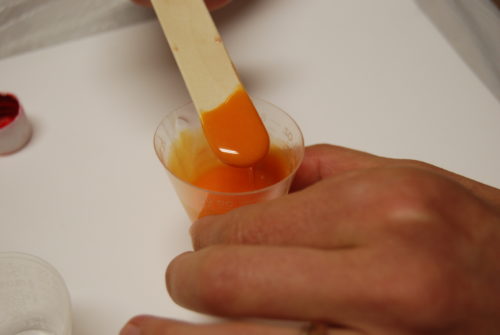
After your resin has been under the lamp for 5 minutes, pour a small amount of the mixed resin into several different measuring cups.
Add in a toothpick tip of Castin’ Craft Opaque Pigments to give the resin a color. If the resin isn’t as opaque as you would like, add in a wee bit more colorant.
Tip: Be sure that the colorant does not equal more than 10% of your resin as having more than 10% could cause issues with curing!
Step 6:
Place some business cards or some heavy card stock onto your work surface, making it easy to move the bezels without getting any resin on your fingers.
Step 7:
Slowly drizzle your mixed colorized resin into the Open Frame Rectangles until partially full, but not domed. Use a toothpick to agitate the resin and make sure there aren’t any air bubbles lurking below the surface. Once you are confident about the air bubbles, continue to pour your resin until the bezel is filled and highly domed.
Step 8:
To finish your open bezel or frame, remove the packing tape from the backside once fully cured. If you have any excess residue from the packing tape on the backside, use the tape to remove it like you would when you are removing lint or animal fur from your clothes. Keep touching the packing tape onto the sticky surface until it is no longer sticky.
Step 9:
To make the bracelet, holes were drilled through the resin using a dremel drill. Use a drill bit that is slightly larger than the jumpring you would like to use. Make a mark on your resin in the place you want to drill. Be sure that your jumpring will fit. Drill your hole. The drill will move quickly through the resin. Once the holes have been drilled you may assemble your pieces. In fact, now that you have all your cured pieces you can assemble them into finished jewelry of your choice.
Shop Supplies!
With each of Cheryl’s pieces, I have attached links of the products that she used. Nunn Design is wholesale only; so make sure to check with our Where to Buy page for retailers who stock our product line.
Bracelet:
- Open Frame Large Rectangle Single Loop
- Large Jumprings
- Heart Charm
- Lobster Clasp
- Nunn Design 2-Part Resin Kit
- Castin’ Craft Opaque Pigments
Necklace:
- Open Frame Small Rectangle Single Loop
- Various Jumprings
- Heart Charm
- Lobster Clasp
- Large Oval Link Chain
- Nunn Design 2-Part Resin Kit
- Castin’ Craft Opaque Pigments
Earrings:
- Open Frame Itsy Rectangle Single Loop
- Various Jumprings
- Heart Charm
- Earwires
- Small Delicate Cable Chain
- Nunn Design 2-Part Resin Kit
- Castin’ Craft Opaque Pigments
Shop Nunn Design Wholesale
Nunn Design has been supplying jewelry artists with findings for over 20 years. Shop wholesale jewelry findings for creative jewelry makers.
Shop Nunn Design!How to Purchase Wholesale?
If you are interested in becoming one of the many designers who trust their jewelry to Nunn Design Findings, please join us by registering to become one of our wholesale customers!
Please visit our Where to Buy Page for a listing of online stores that sell Nunn Design Findings retail.

If you enjoyed reading this post, please subscribe to our blog. Here are 10 Reasons Why to Subscribe and a place to do so!