


Inside Nunn Design, Tutorials
7 More Resin & Epoxy Clay Techniques and How They Are Created!
![]()
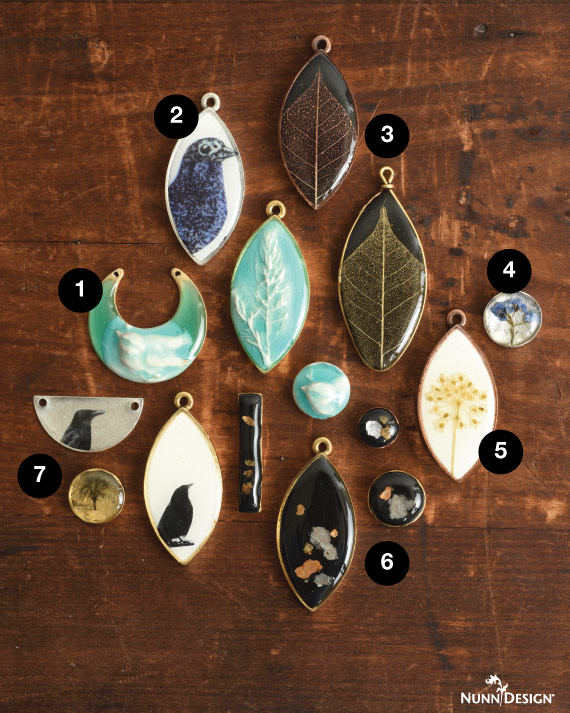
Another round of inspiration on how to use Nunn Design’s 2-Part Resin and Epoxy Clay.
Here are 7 MORE ways that you can create unique pieces of wearable art with Nunn Design 2-Part Resin and Epoxy Clay.
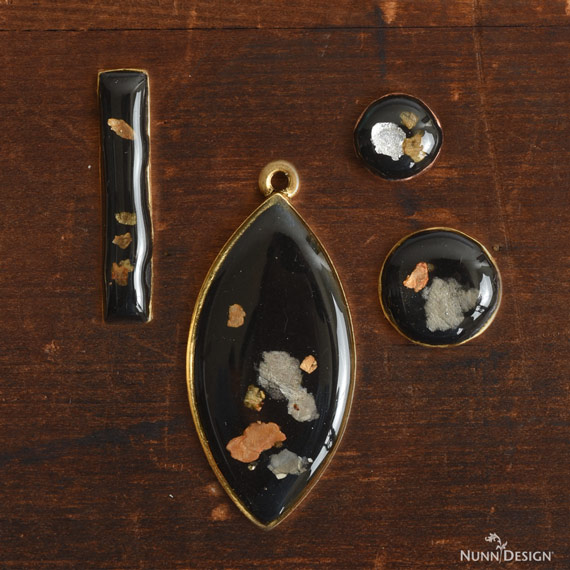
1. Sculpted Relief Epoxy Clay with Colorized Resin
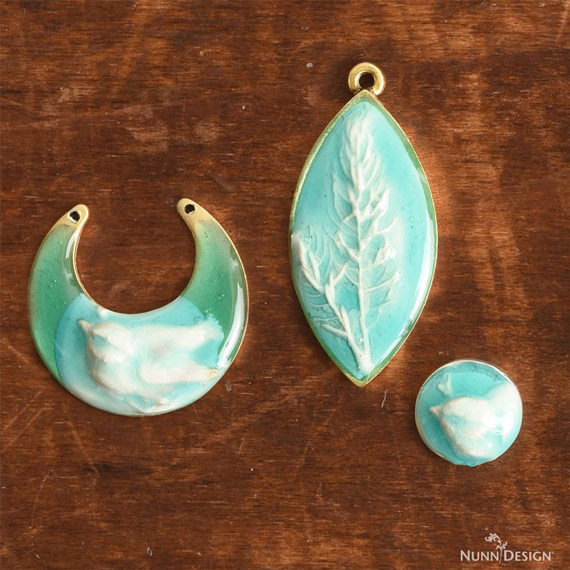
I love this technique. There are several steps and this technique can seem a bit overwhelming, but the finished jewelry pieces are so stunning. I find that I do this technique in batches. A lot of times, I will have extra bits of Epoxy Clay that I will just press into a Nunn Design Bezel, press into one of my many molds, then let them to cure. After a while, all of these pendants start to amass in one of my “parts and pieces bins” and I’ll pull them all out and pour some almost left over curing colorized resin onto the top of them. Again, a great technique to just do, but also a great technique for using up excess bits of Epoxy Clay and Nunn Design 2-Part Resin before it sets-up and is wasted.
Learn the Techniques!
Shop Supplies:
shop Buy & Try Sculpted Relief
Shop Supplies Wholesale:
- Buy & Try Sculpted Relief
- Silicon Putty
- Epoxy Clay
- Nunn Design Resin
- Castin’ Crafts Opaque Pigments (Colorants)
2. Colorized Resin with Transfer Sheets
Another technique that requires multiple pours of resin, but great for creating unique one of a kind jewelry.
Learn the Techniques!
Shop Supplies:
SHOP NOW BUY & TRY TRANSFER SHEETS – COLORIZED RESIN, OPEN BACK BEZELS
Shop Supplies Wholesale:
- Buy & Try Transfer Sheets – Colorized Resin, Open Back Bezels
- Nunn Design Resin Kit
- Castin’ Crafts Opaque Pigments (Colorants)
- Transfer Sheets
- Open Pendants Cast
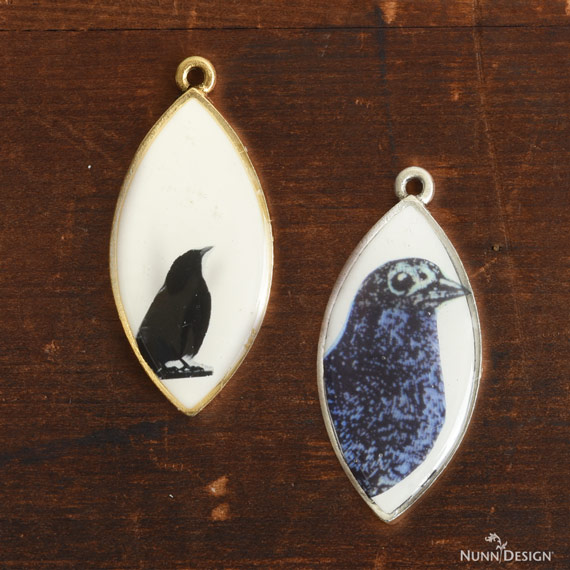
3. Organics on Epoxy Clay
![]()
This is actually a technique that we haven’t done yet. But here are the basic steps:
- Mix two equal balls of black Epoxy Clay
- Place into the base of a bezel
- Press dried organics into the clay. I actually used a skeleton leaf here.
- Mix Nunn Design 2-Part Resin
- Pour onto Epoxy Clay (yes, while it is still wet) and then let cure
Pretty basic, huh?
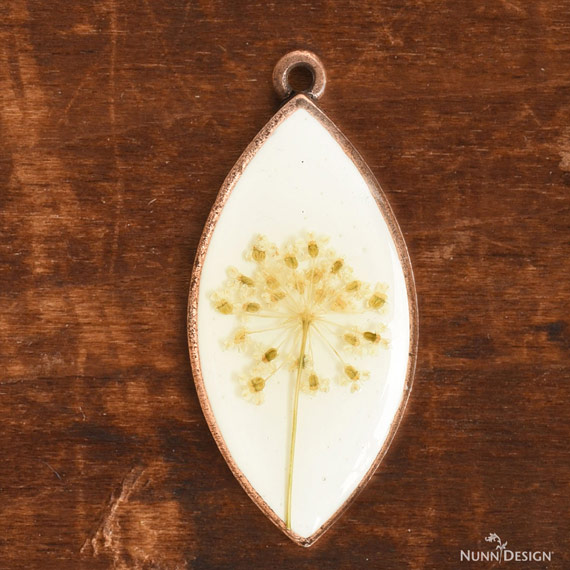
4. Organics on Flat Tag
![]()
Adding pressed dried organics onto flat tags and then applying resin is actually a fairly easy process. The trick is in making sure your organics are fully preserved and allowing plenty of time to “babysit” your curing resin pieces.
Learn the Techniques!
5. Organics on Colorized Resin
This technique also involves multiple pours. You have the colorizing and pouring of the resin into the base. The preserving and pressing of the organics. Then another mix of resin to pour on the top. The steps aren’t hard, just time consuming. The results are stunning!
Learn the Techniques!
6. Epoxy Clay with Mica Flakes and Resin
This technique is fast because you don’t need to let the Epoxy Clay cure prior embedding the Mica Flakes and pouring on the Nunn Design 2-Part Resin. 2 steps, but rich results!
Learn the Techniques!
7. Transfer Sheet on Flat Tags
Yet another tutorial that we haven’t done a full tutorial on (yet!), but here are the basic steps.
- Clean the Flat Tag
- Cut out the Transfer Sheet
- Mix Nunn Design 2-Part Resin
- Place Transfer Sheet into water to separate from paper backing
- Place a small amount of resin onto Flat Tag
- Dry Transfer Sheet once paper backing is removed and apply onto resin covered Flat Tag.
- Move Transfer Sheet into the desired position with a toothpick. Squeeze out any bubbles that might be under the Transfer Sheet.
- Drizzle on more Resin onto the Flat Tag until the resin is domed.
- Let cure
- Assemble
Phew! There you have it! 7 MORE resin techniques to explore!
Shop Wholesale Nunn Design Findings
Shop Nunn Design Wholesale
Nunn Design has been supplying jewelry artists with findings for over 20 years. Shop wholesale jewelry findings for creative jewelry makers.
Shop Nunn Design!How to Purchase Wholesale?
If you are interested in becoming one of the many designers who trust their jewelry to Nunn Design Findings, please join us by registering to become one of our wholesale customers!
Please visit our Where to Buy Page for a listing of online stores that sell Nunn Design Findings retail.

If you enjoyed reading this post, please subscribe to our blog. Here are 10 Reasons Why to Subscribe and a place to do so!