


Tutorials
How to Colorize Resin & Apply Gilding Flakes!
Creating with resin is a learned skill. Just like learning how to bake cookies. Once you have learned the basics it is easy to take those skill and expand.
Keeping your designs fresh and continually adding new looks to your collections of jewelry is a critical part of keeping your customers engaged with your brand. Some of your creative attempts will sell. Some of them won’t. What is important is that you explore. That you test. That you observe.
Colorizing Resin and adding Gilding Flakes is a technique we are going to explore in this tutorial. Many of you have 2-part resin. Many of you have Castin’ Craft Opaque Pigments. All you will need in addition to those resin staples are some Gilding Flakes, an item that we are offering while supplies last at 20% off.

For this technique, I applied colorized Nunn Design 2-Part Resin into the base of the bezel and allowed the resin to fully cure. A second coat of clear resin was mixed and drizzled into the bezels. Gilding flakes were inserted into the resin, which allows each piece to be one-of-a-kind.
Another aspect that makes this technique uniquely yours, is that you can choose from so many color combinations. Mixing Castin’ Craft Opaque Pigments into your resin will allow you to create an endless amount of on-trend colors.
Learn How!
Supplies:
Nunn Design Bezels
Nunn Design Resin Kit
Castin’ Craft Opaque Pigments
Gilding Flakes
Other Supplies Needed:
Q-Tips
Rubbing Alcohol
Wet wipes
Toothpicks
Gloves
Timer
Glossy business cards or card stock
Plastic Bags, such as a Ziploc
Packing Tape
Preparing Your Nunn Design Bezels

Step 1: Nunn Design Findings are plated with precious metals and then oxidized to provide an aged look. It is a good idea to be in the practice of cleaning your bezels thoroughly prior to pouring resin. Cleaning the bezels will remove any potential dirt, oils and oxidization residue. Paying attention to the smallest of details from the beginning will allow for a higher quality finished jewelry piece.
To clean, wet the tip of a Q-Tip with rubbing alcohol and clean away any of the blackened oxidization on all the surfaces of the bezel. You can also use a wet-wipe.

Step 2: I tend to work in a small area (typically my kitchen table), so I like to work on a surface that projects can be easily moved around and not disturbed. Place some business cards or some heavy card stock onto your work surface, making it easy to move the pendants without getting any resin on your fingers.

TIP: I would recommend covering the card with glossy packing tape. This will prevent the resin from sticking to the paper.
How to Mix Nunn Design 2-Part Resin
The Nunn Design Resin Kit contains:
A 4-ounce bottle of clear epoxy resin
A 4-ounce bottle of epoxy hardener
2 precision tips to screw onto the bottles
5 mixing cups
5 mixing sticks
Printed instructions on how to mix the resin

Step 3. Read the resin instructions for safety concerns regarding the Nunn Design Resin. Put on your latex gloves and I would recommend safety glasses. I wear readers so I think that my eyes are protected. Make sure you have a pile of wet-wipes on the ready!
Step 4. To mix the resin you’ll want to have an exact one-to-one ratio. The one-to-one ratio has to be one tablespoon of Part A first and one tablespoon of Part B. This is a volume thing, not a weight thing. You have to mix the full mixing cup of resin to have the resin properly activate. I thought this was an excuse to get me to use more resin, but trust me, it isn’t! It is important to pour Part A first into the cup and then Part B. It is a chemical thing about part A being heavier or something.
Place one of the mixing cups included in the Nunn Design Resin Kit onto your table. I suggest getting your eyes level with the resin so you can see the lines on the measuring cup. Remove the lid to Part A of your resin kit and slowly pour the resin into the mixing cup up to the 1 Tablespoon mark. I suggest that you go slow until you start to gain more confidence. When you start to get near the 1 Tablespoon line, tilt the Part A bottle down, slowing the flow of the resin. Slowly drizzle the resin into the cup until you have hit the 1 Tablespoon mark EXACTLY! To end the flow of the resin, twist the bottle. Use a wet-wipe to fully clean up resin from the edge of the bottle. Make sure to put the Part A lid back onto the resin bottle.
I fold my wet-wipe over to make sure I don’t contaminate Part B when I clean up the edge of that resin after I pour it. I am also making sure that I don’t get any of the resin onto my hands.Following all the same steps used for Part A, pour Part B into the mixing cup until it is EXACTLY at the 2 Tablespoon mark. Clean up the edge of the resin bottle and securely twist the Part B cap back onto the resin.

Step 5. Set your timer for 2 minutes. Using the stir stick from your Nunn Design Resin Kit, slowly and carefully stir your resin scraping the bottom of the cup and the sidewalls as you stir. Go slowly because it is easy for the cup to overflow. I hold the cup down at the base and use my fingers to help rotate the cup around. Stop from time to time and scrape the resin from the sides of the stir stick and continue to stir for the full 2 minutes. If your resin is still cloudy after your timer has gone off, continue to mix until clear.
After mixing is complete and your resin is clear, scrape both sides of your stir stick on the edge of your resin filled cup.

TIP: Another habit that I have developed is being aware of where I rest my stir sticks. To avoid getting resin all over my work surface, I like to rest the resin stir sticks in one of the mixing cups or onto a small Ziploc. I can easily peel the resin off of the Ziploc and reuse it. I can also reuse my stir stick once the resin has fully cured. I do know people who wipe out and reuse their mixing cups, but I haven’t done that so I cannot recommend it.
How to Colorize Nunn Design 2-Part Resin with Castin’ Craft Opaque Pigments
Step 6. For this tutorial, I used Nunn Design Resin and Castin’ Craft Opaque Pigments in Blue, Red and white to create Pantone 15-3817.
Pantone 15-3817
Formula:
- 1 tiny toothpick tip Blue
- 1 toothpick tip Red
- 1 toothpick tip White
To create more 2017-2020 Pantone Colors, download the Pantone Color Formula Cheat sheet!
Step 7. To colorize the resin, place another empty resin mixing cup onto your work area. Pour the clear, mixed resin into the cup, filling it to the 1 TSP (you may need more of the full TBSP mixed, but you can easily colorize more).

Step 8: The Castin’ Craft Opaque Pigments are very potent. Let’s define what a “tiny toothpick tip” and a “toothpick tip” amount of colorant should look like. This is not an exact science. If you don’t get the exact amount, your color will still come out fairly close.
A “tiny toothpick tip” should look like this.
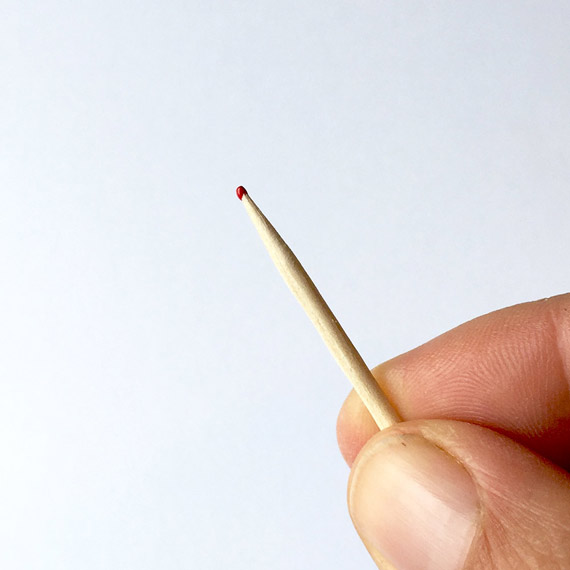
A “toothpick tip” should look like this.

“Large toothpick” should look like this.

Step 9. Add a toothpick tip of Castin’ Craft Opaque Pigment – red or blue colorant into the clear mixed Nunn Design Resin and mix fully until blended. If you want the color to be even more opaque, add more of the Castin’ Craft Opaque Pigment.
TIP: Be sure that the colorant does not equal more than 10% of your resin as having more than 10% could cause issues with curing.

Apply the Colorized Resin:
Step 12. With your bezel on a business card, slowly drizzle your mixed colorized resin into the bezel until the base of the bezel is filled – but not completely full – you will want to have the colorized resin under-fill the bezel.
Step 13. Use a toothpick to agitate the resin and make sure there aren’t any air bubbles lurking below the surface. Make sure to run your toothpick along the inside edges to agitate any pending bubbles.
Let the Colorized Resin Cure
Step 14. Babysit the curing colorized resin for the first 1-2 hours. If you see bubbles rising to the surface, using your hot breath, breathe on them. It isn’t a “blow” sort of breath – more of a “huff” sort of a breath. The hot air will make the bubbles expand, rise to the surface and pop. As the resin starts to set-up and become thicker, it will be more difficult for the air to rise to the surface.
After the resin has cured 12 hours or until it is firm (you can use a toothpick to gently poke it), it is time to add in your Gilding Flakes
Applying the Gilding Flakes

Step 15. Follow Steps 3-5 for mixing another batch of clear Nunn Design Resin.
Step 16. Drizzle a small amount of resin over the top of the colorized resin. This will provide a bed of resin for the Gilding Flakes to rest onto.
Step 17. Use a toothpick to move the clear resin around on the surface of the colorized resin within the bezel. Make sure to drag the toothpick around the inside edge of the bezel to agitating the clear resin. This is where air likes to get trapped, so doing this step will help eliminate those pesky bubbles.
Step 18. With a toothpick or pair of tweezers, pick-up some of the Gilding Flakes from the container and place them into the resin. Use your toothpick to submerge the flakes into the resin.
Step 19. Use a toothpick or stir stick to drizzle clear resin over the Gilding Flakes until you have a nice domed surface.
Step 20. If you have resin that has over-poured, wait about 6-12 hours until the resin is at its “soft cure” phase. Use a pair of needle nose pliers to bend back the resin from the bezel. The resin will easily separate and peel off of the bezel.
Step 21. Let the resin cure for 12-14 hours. The resin will be hard to the touch but will continue to cure for the next 72 hours.
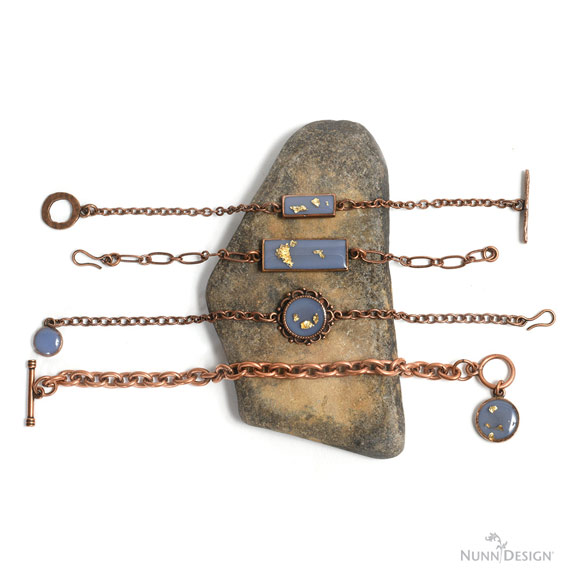
Be Inspired:


Design Options!
You might also be interested in this tutorial. It walks you through a very similar technique using a Nunn Design Open Back Bezel and organics.
![]()
Shop Supplies Wholesale:
Shop Nunn Design Wholesale
Nunn Design has been supplying jewelry artists with findings for over 20 years. Shop wholesale jewelry findings for creative jewelry makers.
Shop Nunn Design!How to Purchase Wholesale?
If you are interested in becoming one of the many designers who trust their jewelry to Nunn Design Findings, please join us by registering to become one of our wholesale customers!
Please visit our Where to Buy Page for a listing of online stores that sell Nunn Design Findings retail.

If you enjoyed reading this post, please subscribe to our blog. Here are 10 Reasons Why to Subscribe and a place to do so!