


Be Inspired, Click! Learn! Make!
Learn How to Make Handmade Jewelry! 24 Techniques to Get You Started!
Part 2 of 3
Learn how to make handmade jewelry with the 24 techniques featured in this 3 part series. This post is part 2 of 3.
Part 1 can be read here.
Part 3 can be read here.
Exploring the many techniques for making handmade jewelry is what Nunn Design is passionate about. The findings that we design and include in our collection allows each artisan the ability to create jewelry that is unique to their own brand.
We believe that jewelry consumers crave something new, but not too new. Nunn Design strives for just the right balance of innovation and classic style allowing for a formula of success.
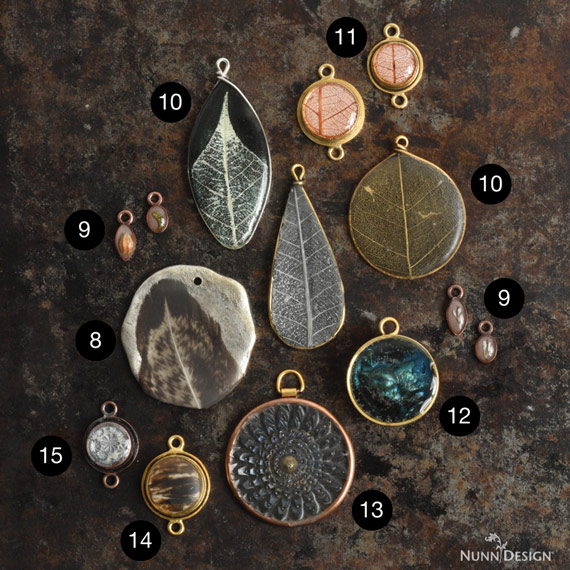
8. Feathers and Resin on Flat Tags

Using organics such as flowers or feathers is a trend that is very popular amongst resin jewelry artists. We don’t have an exact tutorial for how to use feathers and resin on flat tags, but I do have this tutorial, Dried Flowers on Flat Tags with Resin Tutorial + Video. All of the steps to create a feather and resin flat tag will be exactly the same with an added step at the very end. Once the resin is fully cured, use a piece of 4 ott steel wool to provide a matte finish to the resin.
Shop the Supplies!
9. Colorized Crystal Clay with Organics

We distribute 3 different colors of Crystal Clay, but other Pantone colors can be created by adding Castin’ Craft Opaque Pigments to white Crystal Clay. A tutorial on how to colorize Crystal Clay will be coming this fall, but let me walk you through the basic steps.
- Mix white Crystal Clay thoroughly.
- Select a Pantone color that you’d like to use from the Nunn Design Pantone Cheatsheet.
- Follow the color formula using the Castin’ Craft Opaque Pigments. Mix the pigments with a toothpick on a cello bag to create the desired Pantone color.
- Once you have achieved the desired color, add the pigment to the white Crystal Clay and blend thoroughly.
- I highly recommend wearing gloves for this process to avoid staining your hands.
Now you are ready to add your colorized Crystal Clay into the base of a Nunn Design Bezel. From here on, this tutorial will walk you through the remaining steps: How to Use Crystal Clay, Organics and Nunn Design Resin
Shop the Supplies!
10. Crystal Clay, Skeleton Leaves and Resin within Wire Frames Tutorial!

This tutorial, Crystal Clay, Skeleton Leaves and Resin within Wire Frames Tutorial, will walk you through the process of how to use Wire Frames with Crystal Clay, skeleton leaves and Nunn Design 2-Part Resin.
Shop the Supplies!
- Crystal Clay
- Nunn Design 2-Part Resin Kit
- Wire Frames
- Skeleton Leaves
11. Crystal Clay, Skeleton Leaves and Resin within a Bezel

In this tutorial, Make These with Crystal Clay, Skeleton Leaves and Nunn Design Resin, the process is the same as this technique, except the bezel makes all of the difference!
Shop the Supplies!
- Crystal Clay
- Nunn Design 2-Part Resin Kit
- Nunn Design Bezels
- Skeleton Leaves
12. Sculpted Colorized Resin and PearlEx Powder in an Open Back Bezel

This tutorial, Sculpted Relief Resin Mold within an Open Bezel, will walk you through the steps of this technique. I love this technique because it solves so many of the challenges that I was having working with cleaning up cured resin. This technique minimizes those challenges!
Shop the Supplies!
- Nunn Design 2-Part Resin Kit
- EasyMold Silicone Molding Putty
- Castin’ Craft Opaque Pigments
- Jaquard PearlEx Powders
- Open Back Bezels
13. Sculpted Resin in an Open Back Bezel

This technique is the same process as technique 12, but I used an Open Frame Hoop instead of an Open Back Bezel. Because the Open Frame Hoop was so shallow, it produced a totally different effect with the sculpted relief.
Shop the Supplies!
14. Excess Resin Embedded into Crystal Clay with Resin

The Team at Nunn Design is always looking for ways to use every last bit of mixed Nunn Design 2-Part Resin before it hardens within the mixing cup. Many of techniques have been the result of our efforts to solve this problem. Here is a link to the many tutorials that are featured on the Nunn Design Blog.
We don’t yet have a tutorial for this exact technique, but let me walk you through a few of the steps.
- Mix Nunn Design 2-Part Resin
- Colorize with Castin’ Craft Opaque Pigments
- Pour onto a Ziplock and let it cure for 6-8 hours
- When the resin is in the “soft cure” stage, use scissors to cut the colorized resin.
- Mix up some Crystal Clay and put it in the base of a Nunn Design Bezel. Press the cut colorized resin pieces into the clay.
- Mix and pour Nunn Design 2-Part Resin over the clay with resin pieces. Let cure.
- To create a matte finish to the resin, use a piece of 4 ott steel wool to lightly sand the surface of the cured resin.
Shop the Supplies!
15. Texturized Crystal Clay with PearlEx Powders and Resin

This is another technique that has numerous tutorials featured on the Nunn Design Blog.
There is so many ways that you can make this technique be uniquely your own by changing the texture design, the colors of the Crystal Clay and the colors of the PearlEx Powders. Have fun with it!
Shop the Supplies!
All 3 Parts in the Series:
Make sure to read the other posts within this series to learn all of the handmade jewelry techniques!
- PART 1: Learn How to Make Handmade Jewelry! 24 Techniques to Get You Started!
- PART 2: Learn How to Make Handmade Jewelry! 24 Techniques to Get You Started!
- PART 3: Learn How to Make Handmade Jewelry! 24 Techniques to Get You Started!
How to Purchase Wholesale?
If you are interested in becoming one of the many designers who trust their jewelry to Nunn Design Findings, please join us by registering to become one of our wholesale customers!
Nunn Design primarily sells wholesale, but we do offer Retail Kits, Embroidery Kits and Retail Buy & Try Programs for certain projects. For all other findings, please visit our Where to Buy Page for a listing of online stores that sell Nunn Design Findings retail.
Shop Nunn Design Wholesale
Nunn Design has been supplying jewelry artists with findings for over 20 years. Shop wholesale jewelry findings for creative jewelry makers.
Shop Nunn Design!How to Purchase Wholesale?
If you are interested in becoming one of the many designers who trust their jewelry to Nunn Design Findings, please join us by registering to become one of our wholesale customers!
Please visit our Where to Buy Page for a listing of online stores that sell Nunn Design Findings retail.

If you enjoyed reading this post, please subscribe to our blog. Here are 10 Reasons Why to Subscribe and a place to do so!