


Nunn Design Online Classes, Tutorials
How to Colorize Nunn Design Resin with Gold Jacquard PearlEx Powder

Originally shared in 2020, this tutorial on exploring PearlEx Powders in resin jewelry remains a favorite for achieving beautiful colors and making the most of your extra resin. Rediscover this timeless technique to bring vibrant, honey-gold tones to your creations while minimizing waste!

If exploring resin is incredibly intimidating, don’t think for a moment that you are alone in this fear. What we focus on here at Nunn Design is taking the mystery out of the resin process. With clear step-by-step instructions, fast and long detailed videos and all the supplies in an easy place to purchase, you will be in good hands for exploring this medium.
For those of you seasoned resin users, you will love this technique. I can’t say how many times I have felt anxious about mixed resin starting to thicken up within my mixing cup. With this technique, just add a splash of Jacquard PearlEx Powders and you are well on your way to ZERO waste!
Let’s get started!
Learn How!
Supplies :
Nunn Design Bezels
Nunn Design Resin Kit
Jacquard Pearl Ex Powdered Pigment 3g-Gold
Other Supplies Needed:
Q-Tips
Rubbing Alcohol
Wet wipes
Toothpicks
Gloves
Timer
Glossy business cards or card stock
Plastic Bags, such as a Ziploc
Steel wool
Tools:
Needle nose pliers
Fast Tutorial Video:
Watch the Fast Video for a quick overview of this technique. For some of you, this will be enough to get you started!
Long Tutorial Video:
Watch the Long Video and see the complete process!
Preparing Your Nunn Design Bezels

Step 1. The Nunn Design Findings are oxidized to provide the aged look to the precious metal plating. Clean the bezel thoroughly prior pouring mixed Nunn Design Resin within the finding. To clean, get the tip of a Q-Tip wet with rubbing alcohol and clean away any of the blackened oxidization on all the surfaces of the bezel.

Step 2. I tend to work in a small area (typically my kitchen table), so I like to work on a surface that projects can be easily moved around and not disturbed. Place some business cards or some heavy card stock onto your work surface, making it easy to move the pendants without getting any resin on your fingers.

TIP: I would recommend covering the card with glossy packing tape. This will prevent the resin from sticking to the paper.
How to Mix Nunn Design 2-Part Resin
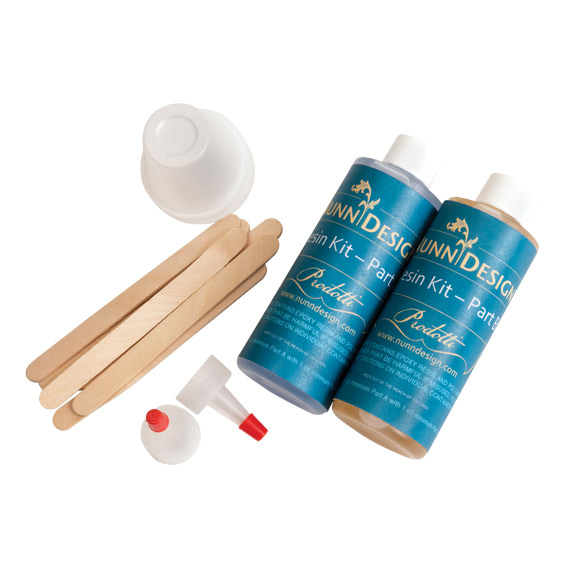
The Nunn Design Resin Kit contains:
A 4-ounce bottle of clear epoxy resin
A 4-ounce bottle of epoxy hardener
2 precision tips to screw onto the bottles
5 mixing cups
5 mixing sticks
Printed instructions on how to mix the resin
Step 3. Read the resin instructions for safety concerns regarding the Nunn Design Resin. Put on your latex gloves and I would recommend safety glasses. I wear readers so I think that my eyes are protected. Make sure you have a pile of wet-wipes on the ready!
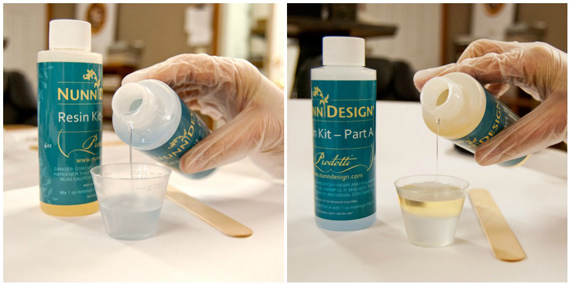
Step 4. To mix the resin you’ll want to have an exact one-to-one ratio. The one-to-one ratio has to be one tablespoon of Part A first and one tablespoon of Part B. This is a volume thing, not a weight thing. You have to mix the full mixing cup of resin to have the resin properly activate. I thought this was an excuse to get me to use more resin, but trust me, it isn’t! It is important to pour Part A first into the cup and then Part B. It is a chemical thing about part A being heavier or something.
Place one of the mixing cups included in the Nunn Design Resin Kit onto your table. I suggest getting your eyes level with the resin so you can see the lines on the measuring cup. Remove the lid to Part A of your resin kit and slowly pour the resin into the mixing cup up to the 1 Tablespoon mark. I suggest that you go slow until you start to gain more confidence. When you start to get near the 1 Tablespoon line, tilt the Part A bottle down, slowing the flow of the resin. Slowly drizzle the resin into the cup until you have hit the 1 Tablespoon mark EXACTLY! To end the flow of the resin, twist the bottle. Use a wet-wipe to fully clean up resin from the edge of the bottle. Make sure to put the Part A lid back onto the resin bottle.
I fold my wet-wipe over to make sure I don’t contaminate Part B when I clean up the edge of that resin after I pour it. I am also making sure that I don’t get any of the resin onto my hands.Following all the same steps used for Part A, pour Part B into the mixing cup until it is EXACTLY at the 2 Tablespoon mark. Clean up the edge of the resin bottle and securely twist the Part B cap back onto the resin.
Step 5. Set your timer for 2 minutes. Using the stir stick from your Nunn Design Resin Kit, slowly and carefully stir your resin scraping the bottom of the cup and the sidewalls as you stir. Go slowly because it is easy for the cup to overflow. I hold the cup down at the base and use my fingers to help rotate the cup around. Stop from time to time and scrape the resin from the sides of the stir stick and continue to stir for the full 2 minutes. If your resin is still cloudy after your timer has gone off, continue to mix until clear.
After mixing is complete and your resin is clear, scrape both sides of your stir stick on the edge of your resin filled cup.

Another habit that I have developed is being aware of where I rest my stir sticks. To avoid getting resin all over my work surface, I like to rest the resin stir sticks in one of the mixing cups or onto a small Ziploc. I can easily peel the resin off of the Ziploc and reuse it. I can also reuse my stir stick once the resin has fully cured. I do know people who wipe out and reuse their mixing cups, but I haven’t done that so I cannot recommend it.
How to Colorize Nunn Design 2-Part Resin with Jacquard PearlEx Powders

Step 6. To colorize the resin with PearlEx Powders, add a stir stick tip of Jacquard PearlEx Powders into the clear mixed Nunn Design Resin and mix fully until blended. If you want the color to be even more opaque, add more of PearlEx Powder.

Pouring Colorized Resin into the Bezel

Step 7. Drizzle a small amount of colorized resin onto the base of the bezel. Use a toothpick to rub along the base of the bezel along the sidewalls. It is easy and typical for air to become trapped in this area. Agitating the resin with a toothpick will dislodge any air bubbles lurking below the surface. Continue to drizzle the colorized resin until the bezel is domed.


Step 8. Double check that your resin is consistently pulled all the way over to the side edge. Use a toothpick to drag the resin, making sure that the full lip of the bezel is covered. This step will provide a clean and professional looking resin pendant.
How to Babysit Your Curing Resin
Step 9. If you see bubbles rising to the surface, using your hot breath, breathe on them. It isn’t a “blow” sort of breath – more of a “huff” sort of breath. The hot air will make the bubbles expand, rise to the surface and pop. As the resin starts to set-up and becomes thicker, it will be more difficult for the air to rise to the surface. Make sure to check in on the curing resin and double check for air bubbles. If you do have some bubbles that won’t pop with your “huff”, use a toothpick to gently drag them over to the sides. This agitation process will help them to pop. When the resin is thick and taffy-like in texture it is time to let it be. If you attempt to pop bubbles at this time, you may end up with a gooey mess.

How to Clean Up Resin Overflows

Step 10. If you have resin that has over-poured or seeped under the bezel and onto the card, wait about 12-18 hours until the resin is at its “soft cure” phase. Remove the bezel from the card. The resin will still be non-tacky but still flexible. Use a pair of needle-nose pliers to bend back the resin from the bezel. The resin will easily separate and peel off of the bezel.

TIP: It may take longer than 12-18 hours depending on your room temperature. You will want the resin to be firm, but not super hard.

Create a Matte Surface with Steel Wool:

Step 11. Once the resin is fully cured, use fine steel wool to gently rub the surface of the colorized resin. This will result in a matte resin surface, versus a shiny resin surface.


Tip: If you have any pits or blemishes in the cured resin surface, these will be accented with the steel wool. I actually like the darkening that occurs, but if this isn’t your cup a tea, try a very fine sandpaper.

Step 12. Wipe down the pendant fully with a wet-wipe.
Step 13. The resin will be hard to the touch but will continue to cure for the next 72 hours. Assemble into something great!
Shop Grande Pendant Bezels:

These four Nunn Design Grande Pendant Bezels, released in Winter 2020, have remained customer favorites!
- Grande Pendant Oval Narrow (gpons)
- Grande Pendant Marrakesh (gpms)
- Grande Pendant Inverted Drop (gpids)
- Grande Pendant Half Circle (gphc)
Shop Nunn Design Wholesale
Nunn Design has been supplying jewelry artists with findings for over 20 years. Shop wholesale jewelry findings for creative jewelry makers.
Shop Nunn Design!How to Purchase Wholesale?
If you are interested in becoming one of the many designers who trust their jewelry to Nunn Design Findings, please join us by registering to become one of our wholesale customers!
Please visit our Where to Buy Page for a listing of online stores that sell Nunn Design Findings retail.

If you enjoyed reading this post, please subscribe to our blog. Here are 10 Reasons Why to Subscribe and a place to do so!