


Tutorials
8 New Tutorials Coming in 2019!

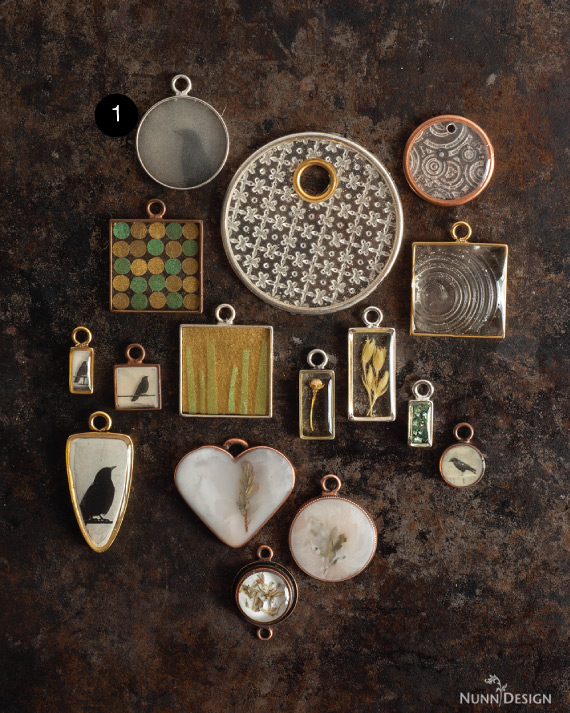
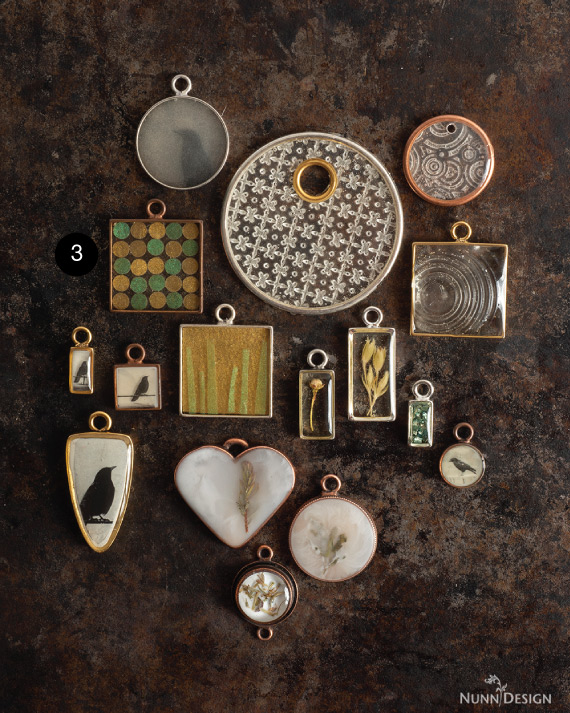
The Nunn Design Master Catalogue is designed to inspire our customers AND to educate them on how to create the various projects. Throughout the catalogue, you can click on a piece of jewelry to learn more and how to create it.
If you come across a piece of jewelry that isn’t linking you to the project of your choice, it is more than likely in the “New Tutorials to Come” hopper here at Nunn Design. This post is a rundown of all the tutorials to come, with a quick glance at how they were created. Many of you will be able to “get the gist” and be off and running, so we wanted to give you a head start!
8 Tutorials To Come:
Here is an overview of all of the tutorials to come from Nunn Design in 2019!
1. Master Catalogue – Cover!
Technique: Crystal Clay, PearlEx Powders and Colorized Resin

This technique is a show-stopper and clearly deserved the spot of cover! You will be “gob smacked” to learn how easy this is to do. Here is the basic how-to:
- Clean bezels with rubbing alcohol
- Mix Crystal Clay-White
- Place mixed Crystal Clay in base of the bezel
- Apply silver PearlEx Powder over clay
- Let cure (although I didn’t and you can see that some silver rose to the top)
- Mix Nunn Design 2-Part Resin
- Colorize mixed resin with Castin’ Craft Opaque Pigments
- Drizzle mixed resin over the Crystal Clay in bezels
- Let cure
Shop Wholesale the Supplies:
2. Master Catalogue – Page 6
Technique: Crystal Clay with Skeleton Leaves and 2-Part Resin


Here is another project that I think you will find to be delightfully simple. Here are the steps to get you started:
- Clean bezels with rubbing alcohol
- Mix Crystal Clay in color of choice
- Place mixed Crystal Clay in the base of the bezel
- Trim a fully dried skeleton leaf to fit
- Press the dried skeleton leaf into the Crystal Clay
- Mix Nunn Design 2-Part Resin
- Drizzle mixed resin over skeleton leaf and Crystal Clay in bezels
- Let cure
Shop Wholesale the Supplies:
- 2019 Winter Collection
- Crystal Clay-White
- Nunn Design Resin Kit
- Soon to come-Skeleton Leafs
3. Master Catalogue – Page 6
Technique: Sculpted Crystal Clay with PearlEx Powders, then Attached with Wire

This technique is very similar to category 3, but with a little twist! Take a look at the tutorial to learn how!
- Create a mold using Silicone Molding Putty from a high relief option
- Mix Crystal Clay in color of choice
- Rub a little PearlEx Powder into the crevices of the mold
- Create the impression into the Crystal Clay by pressing it into the Silicone Mold.
- Use a toothpick to create a couple holes along the side of the pendant.
- Cut 1’ of 22-gauge wire. Thread the wire through the hole in the Crystal Clay and wrap it around the Wire Frame several times.
- Use your flush cutters to cut away the extra wire. I cut the wire consistently where it was coming up through the Crystal Clay hole.
Shop Wholesale the Supplies:
4. Master Catalogue – Page 20
Technique: Colorized Resin with a Transfer Sheet in an Open Back Bezel

Sometimes I’m amazed at the tutorials that we don’t yet have up on the website. Really, have we never shown how you can use colorized Nunn Design Resin and use an open back with a transfer sheet? Well actually, we have in this tutorial: Colorized Resin in an Open Back Bezel with Transfer Sheets. It just looks so different here. A different Nunn Design Open Back Bezel was used. A different Castin’ Craft Opaque Colorant, in this case a very muted opaque white was mixed into the Nunn Design 2-Part Resin. Here are the basic steps:
- Clean Open Back Bezel with rubbing alcohol
- Apply packing tape to the backside of the Open Back Bezel
- Mix Nunn Design 2-Part Resin
- Colorized mixed resin with Castin’ Craft Opaque Pigments-White
- Drizzle mixed colorized resin into the Open Back Bezel
- Insert Nunn Design Transfer Sheet
- Drizzle more colorized resin over transfer sheet until domed
- Let cure
- Remove packing tape from back of Open Back Bezel
Shop Wholesale the Supplies:
- 2019 Winter Collection
- Nunn Design Transfer Sheets
- Nunn Design Resin Kit
- Castin’ Craft Opaque Pigments – White
5. Master Catalogue – Page 20
Technique: Colorized Resin Mosaics

This is another tutorial where we have done something like this, but the look is so very different!
Create Colorized Resin Mosaics with Excess Resin Tutorials. I did mix some things up for this jewelry sample, so let me outline what I did here.
- Mix Nunn Design 2-Part Resin
- Colorized mixed resin with Castin’ Craft Opaque Pigments
- Spread mixed resin onto a silicone baking mat (mine had a bit of texture to it)
- Set a timer for 5 hours. The resin will be at a soft cure stage.
- Peel resin off of the silicone baking mat
- Cut with scissors or punch holes with a leather punch
- Clean Open Back Bezel with rubbing alcohol
- Apply packing tape to the backside of the Open Back Bezel
- Insert cut and punched resin pieces
- Mix Nunn Design 2-Part Resin
- Drizzle into bezel, covering the cut and punched resin pieces
- Let cure
- Remove packing tape from back of Open Back Bezel
Shop Wholesale the Supplies:
6. Master Catalogue – Page 40 & 41
Technique: Colorized Resin with PearlEx Powders and Organics

It was when I was playing around with the Hammered Bitsy Rings with Colorized Resin and PearlEx Powders, I became curious on how I could create this look with organics. It has taken some trial and error, but the tutorial is to come this year. Here is a basic outline for those who are ready to get going sans me:
- Clean bezels
- Mix Nunn Design 2-Part Resin
- Colorize ½ of the mixed resin with Castin’ Craft Opaque Pigment-White
- Drizzle colorized resin into bezel of the bezel. Fill bezel until almost ¾ full.
- Pour a small amount of clear resin onto a plastic bag. Add a toothpick of PearlEx Powder the to clear resin and blend.
- Swirl some of the mixed PearlEx Resin into the white resin that is inside of the bezel. I swirl the PearlEx resin mix only underneath or near where I was going to lay the organics into the resin.
- When resin is slightly set-up, lay the organics into the resin. If the resin isn’t slightly set-up, the organics will sink to the bottom.
- With the remaining clear resin, pour over the top. On the sides of the organics, I swirled some of the white together with the top coat of clear.
- Let cure for 24 + hours.
- Lightly sand with a very fine steel-wool.
Shop Wholesale the Supplies:
7. Master Catalogue – Page 71
Technique: Crystal Clay with PearlEx Powders


This project is so simple, it is hard to believe that I don’t have a single tutorial featuring this technique. The finished jewelry is simple, yet very elegant. Here is a basic outline to get you started.
- Clean bezels with rubbing alcohol
- Mix Crystal Clay-White
- Place mixed Crystal Clay in the bezel until clay is flush to the bezel’s edge.
- Use a wet-wipe to create a smooth finish to the Crystal Clay
- Apply silver PearlEx Powder over clay
- Let cure
Shop Wholesale the Supplies:
8. Master Catalogue – Back Cover
Technique: Crystal Clay Mica Flakes and Colorized Resin


This collection of jewelry made the back cover of the Nunn Design Master Catalogue. Like the front cover, this technique is shockingly simple, once you have the basics of how to use Crystal Clay, how to mix Nunn Design 2-Part Resin and how to add Castin’ Crafts Opaque Pigments. Here is a basic outline to get you started:
- Clean bezels with rubbing alcohol
- Mix Crystal Clay-White
- Place mixed Crystal Clay in base of the bezel
- Apply Mica Flakes into the Crystal Clay
- Let cure
- Mix Nunn Design 2-Part Resin
- Colorized mixed resin with Castin’ Craft Opaque Pigments – Red
- Drizzle mixed resin over the Crystal Clay in bezels
- Let cure
- Sand with a fine steel wool
Shop Wholesale the Supplies:
- 2019 Winter Collection
- Crystal Clay-White
- Mica Flakes
- Nunn Design Resin Kit
- Castin’ Craft Opaque Pigments – Red
Thank you for being patient while we get these tutorials together! Hopefully these quick bits will get you started on your own creative play!

If you enjoyed reading this post,
please subscribe to our blog.
Here are 10 Reasons Why to Subscribe
and a place to do so!
Shop Nunn Design Wholesale
Nunn Design has been supplying jewelry artists with findings for over 20 years. Shop wholesale jewelry findings for creative jewelry makers.
Shop Nunn Design!How to Purchase Wholesale?
If you are interested in becoming one of the many designers who trust their jewelry to Nunn Design Findings, please join us by registering to become one of our wholesale customers!
Please visit our Where to Buy Page for a listing of online stores that sell Nunn Design Findings retail.
If you enjoyed reading this post, please subscribe to our blog. Here are 10 Reasons Why to Subscribe and a place to do so!