


![]()
If you have worked with resin before, you often have some leftover resin you don’t want to waste. This tutorial will help your resin be “good to the last drop.”
Resin, when it is still curing, is very soft and can be easily cut with scissors and even rolled. Create interesting mosaics with the excess resin that would have otherwise been sent off to the trash!
Shop Wholesale: Buy & Try Resin Mosaics – Colorized Resin, Open Back Bezels
Supplies Needed:
Nunn Design Open Pendants
Colorized Nunn Design Resin
Others:
Packing Tape
Wet-wipes
Toothpicks
Stir Sticks
Mixing Cups
Business Cards or glossy card stock
Goo-Be-Gone
Rubbing Alcohol
Plastic Bags
Q-Tips
Tools:
Scissors
Tweezers
Needle Nose Pliers
Learn How:
Step 1:
Sometimes it is challenging to get everything completed before my resin starts to set-up. If this is your experience too, have some plastic bags, like ziplock, handy to pour your resin onto. Spread the resin around with a stir stick until it is thinned out.


Step 2:
After 12 hours, the resin will be slightly cured, yet soft enough to roll and cut with scissors. Peel the resin up from the plastic bag and lay on a flat surface.


Step 3:
Use a pen to trace the inner dimensions of a Open Pendant onto the resin. For my first pieces, I mixed all three colors together, so trace the design on multiple colors of cured resin.

Step 4:
Cut a piece of packing tape and place it on your work surface. Place an Open Pendant onto the tape. Using your fingertips, press the pendant down onto the packing tape and rub back and forth on your work surface to make sure it is burnished down.

Tip:
Check to see that your packing tape is clear and there is no residue or mottling in the adhesive. If there is, it will show up in your finished resin piece when you remove the tape once the resin is cured. Try to use an area of the tape that does not have blotches or marks.
Step 5:
Trim away any excess packing tape from around your Open Pendant to avoid the curing resin piece from being potentially disturbed.

Tip:
I like to place each bezel on its own individual piece of packing tape. It makes the pouring easier to manage and eliminates the chance of disturbing the bezel next to it.
Step 6:
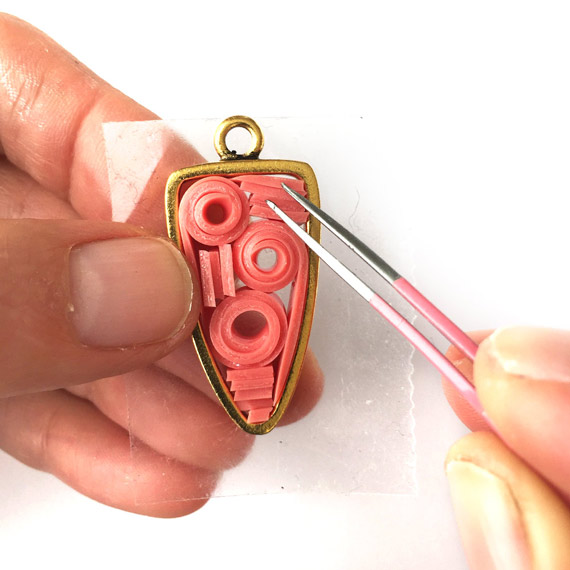
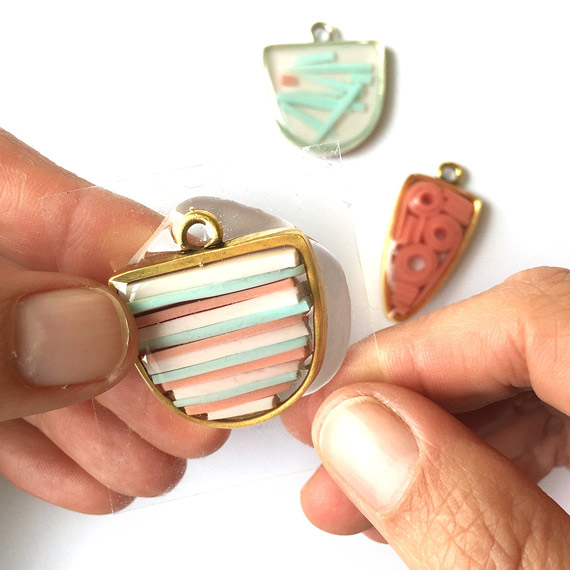
Using a pair of scissors, cut the cured resin into design patterns of your liking. The resin is soft enough to be rolled into spirals and placed into the Open Pendants.


Step 7:
Use a pair of tweezers to embed the resin into the Open Pendant, securing it onto the packing tape.
Step 8:
I tend to work in a small area (typically my kitchen table), so I like to work on a surface that projects can be easily moved around and not disturbed. Place some business cards or some heavy card stock onto your work surface, making it easy to move the pendants without getting any resin on your fingers.

Step 9:
Read the resin instructions for safety concerns regarding the Nunn Design Resin. When I work with resin, I always:
- Place a large plastic bag over my work surface and tape it down.
- I make sure I have ventilation in my workroom.
- I wear gloves.
- I wear glasses (readers because I can’t see anymore. Plus it protects my eyes!).
- I have a pile of wet wipes handy.
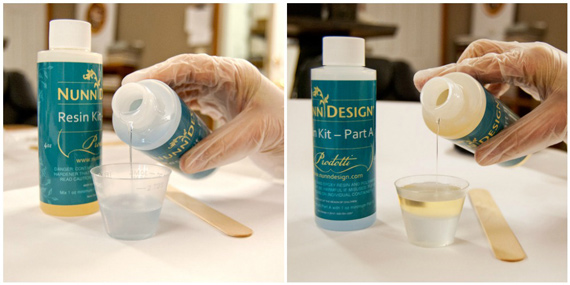
Step 10:
Place one cup (included in the Nunn Design Resin Kit) onto your table. For curing purposes, it is very important that the resin be an exact 1 to 1 ratio of Part A and Part B. I suggest getting your eyes level with the resin so you can see the lines on the measuring cup. Pour Part A of your resin kit up to the ½ fluid ounce mark on your measuring cup. Pour Part B of your resin kit into the same cup until it is filled to the 1 fluid ounce mark. It is important to pour Part A first and then Part B. It is some chemical thing about the part B being heavier or something.
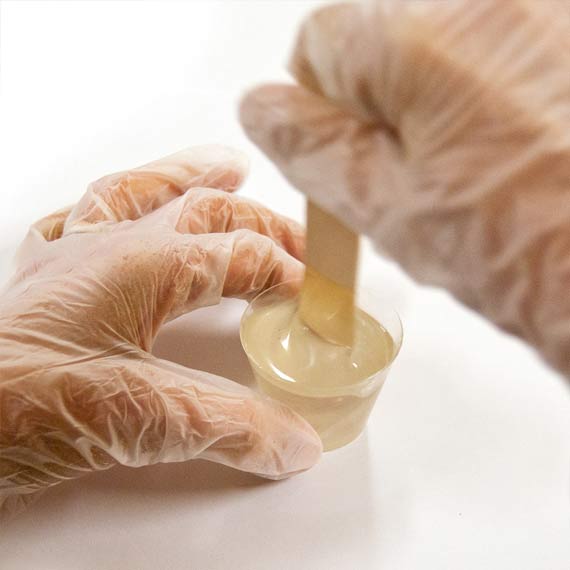
Step 11:
Set your timer for 2 minutes. Using the stir stick from your kit (a popsicle stick or coffee stir stick will work great too), slowly and carefully stir your resin scraping the sides as you stir. Stir for a minimum of 2 minutes. If your resin is still cloudy continue to mix until clear. After mixing is complete and your resin is clear, scrape both sides of your stir stick on the edge of your resin filled cup.
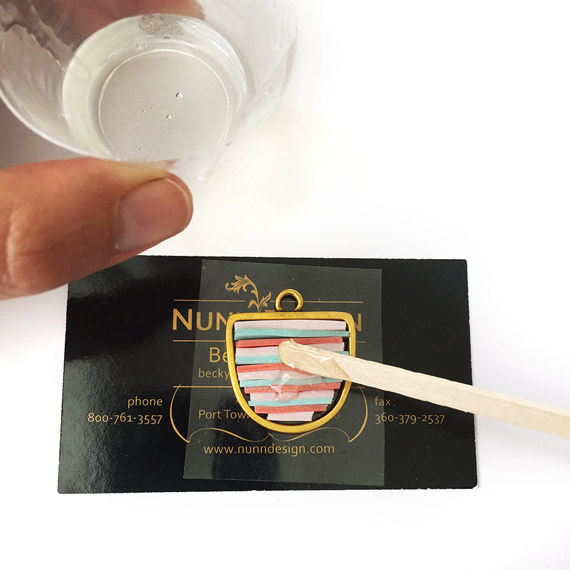
Step 12:
Slowly drizzle your mixed resin into the Open Pendant until the base of the bezel is filled.
Step 13:
Use a toothpick to agitate the resin and make sure there aren’t any air bubbles lurking below the surface.
Step 14:
If you have any resin where you don’t want it, use a Q-Tip to clean up the surface. If any of the resin spills over the sides, don’t worry. I’ll show you how to easily clean that up once the resin is slightly cured.
Step 15:
Set the bezel aside for 12 hours until the resin is slightly cured. If you see bubbles rising to the surface, using your hot breath, breathe on them. It isn’t a “blow” sort of breath – more of a “huff” sort of a breath. The hot air will make the bubbles expand, rise to the surface and pop. As the resin starts to set-up and become thicker, it will be more difficult for the air to rise to the surface. Make sure to check in on the curing resin and double check for air bubbles. If you do have some bubbles, use a toothpick to gentle drag them over to the sides. This agitation process will help them to pop. When the resin is thick and taffy like in texture it is time to let it be. If you attempt to pop bubbles at this time, you may end up with a gooey mess.


Step 16:
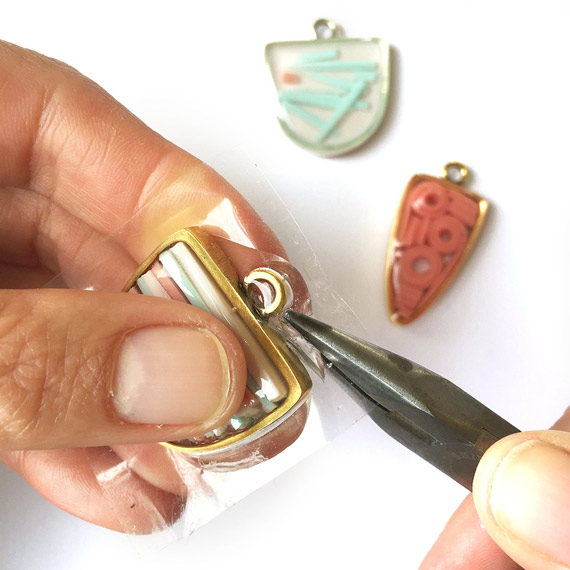
If you do have some overflow, let your resin filled bezel set for 12 hours. After 12 hours, the resin will be set, but still very flexible. Use a pair of needle nose pliers to pry away the resin from the pendant. The resin will easily peel away and is fairly easy to pick-off with your fingernails.


Step 17:
Remove the packing tape from the backside once fully cured. If you do it after 12 hours (like I did so I could remove the spillage from step 16) the resin will still be very flexible and can easily “bow” within the bezel. Just go slow and don’t press or pull too hard.


Step 18:
If you have any excess residue from the packing tape on the backside, use the tape to remove it like you would when you are removing lint or animal fur from your clothes. Keep touching the packing tape onto the sticky surface until it is no longer sticky. If the residue isn’t coming up, try Goo Be Gone! Follow the manufacture’s instructions for best results. I applied a couple drops on the backside and let it sit for over a minute. I then used a stir stick to scrape the tapes residue. To remove all that sticky mess, pour some rubbing alcohol onto a wet-wipe and wipe it away.
Additional Information!
Another blog post that you might be interested in is; How to Make 2017 Summer Pantone Colors with Colorized Resin. In this post I list formula to mixing Nunn Design Resin with Castin Crafts Opaque Pigments to create colors from the 2017 Summer Pantone selection.
Shop Wholesale Nunn Design Findings
Shop Nunn Design Wholesale
Nunn Design has been supplying jewelry artists with findings for over 20 years. Shop wholesale jewelry findings for creative jewelry makers.
Shop Nunn Design!How to Purchase Wholesale?
If you are interested in becoming one of the many designers who trust their jewelry to Nunn Design Findings, please join us by registering to become one of our wholesale customers!
Please visit our Where to Buy Page for a listing of online stores that sell Nunn Design Findings retail.

If you enjoyed reading this post, please subscribe to our blog. Here are 10 Reasons Why to Subscribe and a place to do so!
Wow! What super fun ideas! I always hate wasting resin – thank you!
I agree! Did you see this post too? It has some fun samples to give you other ideas. There is also a video: https://www.nunndesign.com/use-excess-colorized-resin-create-mosaic-pendants-tutorial-video/
I have a question I’ve wondered about for a long time. Becky, how do you decide which colors to use? I love your use of pastels – especially the hues you choose. (Maybe I should trade in everything and become a poet?) I tend to use bright, in-your-face colors. I don’t mean to that’s just the path I always take. I never noticed it until I started paying attention to the much softer, muted colors you use. Are these the colors you choose in life? Or do you have to make a conscious decision to make the colors light and “airy”? Is that a natural process for you? If it’s a comfortable choice for you do you ever challenge yourself to create with bright pinks, wild blues, and vivid greens? If so, how do you split from your comfort zone? (I’m pretty sure I wouldn’t be the only one falling over to find your house is full of loud colors and lots of glitter!)
One other question as long as I’m asking…you create some delicious colors. Do you just begin by mixing a little of this and a drop of that until you get a color you love? Do you stick to a specific color-mixing formula? What happens if you notice a bubble and need to fill it with the same color – how do you ensure you can replicate the same color?
Your projects seem representative of YOU – I imagine your life to be full of natural, simple things that have a calming effect. That’s a feeling that distinguishes your creations from others on the market – making your items are instantly recognizable. Do you have to work at utilizing a natural style, so it has universal appeal? Or is that an accurate representation of who you are?
Katherine-
Color is hard for me, because of all of the reasons that you are suggesting. Color is so personal. I have always been shy to color. I tend to like a very basic and natural palette of white, black and chocolate brown. They are classic and will not trend in or out of fashion.
When I’m designing jewelry samples, I try to go with colors within the season or the color according to the color predictor.
I don’t just dabble, I follow the Nunn Design Color Chart that we have created for our customers: https://www.nunndesign.com/20-formulas-colorizing-nunn-design-resin/. Hopefully you will find some colors in here that work for you.
I also try to highlight a lot of other artists. For example, Cheryl loves color and she isn’t afraid of exploring great color combinations.
I hope this helps.
Becky
That is a big help, thank you! Your creations are so different from mine that it always makes me wonder where you get your ideas. That is one of the things I adore most about Nunn pieces – they work well for an endless variety of styles. It always surprises me how I will see the new line and instantly think of projects to make – then you will put out some samples, and I find them more beautiful than what I had initially thought of…but then realize they have a universal appeal. I think it is the exceptional quality and beauty of every piece, combined with the wild versatility of the lines you create that make Nunn such a success.
It’s nice to know your ideas, struggles, and how you arrive at the complex decisions regarding which pieces to manufacture – it reminds me you ARE human and not some perfect jewelry creating robot. (Which does occasionally run through my mind. I’m not gonna lie!) I have never been able to get through a new Nunn catalog without getting goosebumps. The styles are so captivating…and so different than my own. I have kept every catalog I’ve received and I enjoy referring to the salivatory-worthy photographs over and over. When I’m in a rut and can’t find my way out, the catalogs and website are the first places I go for creative sparks and rejuvination. Our basic designs may be entirely different, but I know your creations will instantly revive my creative juju. Nunn catalogs = 5-Hour Energy on paper!
I knew about the color chart Heather put together – which is awesome. I was speaking more to the colors you guys haven’t yet figured out…do you try to work out the formula before creating the piece? Or do you start mixing random colors and going from there?
Thanks for answering. Your personal input is one of the reasons so many are stuck on Nunn!
BTW I love how you highlight other artists – I have found several people I really admire from work you’ve showcased! 🙂