


Making/Using Molds, Nunn Design Online Classes, Tutorials
How to Create Sculpted 2-Part Epoxy Clay with Colorized Resin!
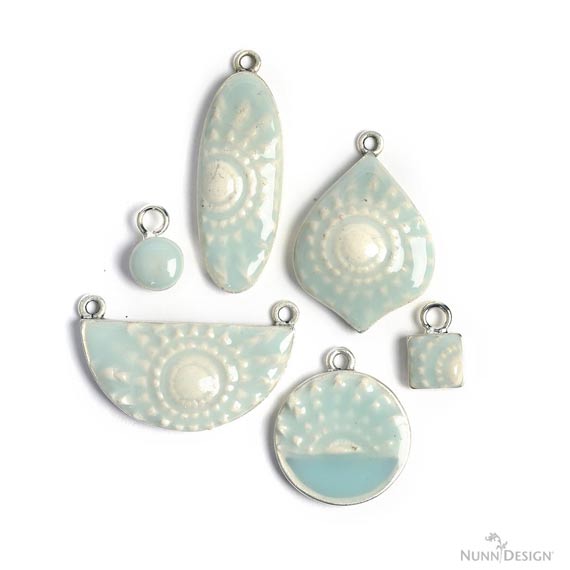
This technique is a hit maker! It has just the right level of “new,” but yet is “familiar.” The final pendants are the perfect balance of the principle; MAYA (Most Advanced Yet Acceptable). I think it is the familiar look of porcelain that makes these pieces so very likeable. It is a look that people know and love.
In this tutorial, we will be covering some of the basic foundations of what we have to teach here at Nunn Design. There are several steps, but you will find that these foundational steps are repeated over and over from tutorial to tutorial.
Let’s get started!
Fast Tutorial Video:
Watch this Fast Video For a quick overview of the process and then read the full tutorial below!
Long Tutorial Video:
Watch the Long Video and see the complete process!
Learn How!
Supplies :
Nunn Design Bezels
Nunn Design Charm, Brass Stamping or buttons
Easy Mold Silicone Putty
Epoxy Clay 50g-White
Nunn Design Resin Kit
Castin’ Craft Opaque Pigments
Other Supplies Needed:
Q-Tips
Rubbing Alcohol
Wet wipes
Toothpicks
Gloves
Baby Powder
Timer
Glossy business cards or card stock
Plastic Bags, such as a Ziplock
Glass Dish
Tools Needed:
Flush Cutters
Prepare Your Nunn Design Bezels:
Step 1. The Nunn Design Findings are oxidized to provide the aged look to the precious metal plating. The oxidization, when it comes into contact with the mixed Epoxy Clay could change the color of the clay. To avoid this, clean the bezel thoroughly prior to placing the Epoxy Clay within the finding.
To clean, get the tip of a Q-Tip wet with rubbing alcohol and clean away any of the blackened oxidization on all the surfaces of the bezel.

Prepare Charm for Mold
Step 2. With a pair of flush cutters, trim away the loop off of the Nunn Design Charm.


Step 3. Apply some olive or baby oil onto a Q-Tip and rub it on the Nunn Design Charm. The olive or baby oil on the charm will help it release easily from the EasyMold Silicone Putty.


Make the Silicone Mold
Step 4. EasyMold Silicone Putty has a 3-minute working time. For best results and maximum window of being able to work with the putty, make sure your room temperature in brought up to 70 degrees.
Step 5. Lay a piece of plastic, such as a small Ziploc Bag, onto your work surface. Pinch off a small grape-sized ball of Part A and Part B of the EasyMold Silicone Putty. Getting the knack for mixing just the right amount of putty will take some practice. You might mix too much or too little putty the first time. Try your best to guess the amount of putty you will need to have approximately 1/8” putty around the outside edge of your bezel’s rim. You will also want the thickness of the silicone putty to be approximately 1/8”.
Step 6. The working time of the silicone molding putty is only 3 minutes, so you will need to work quickly. Take a moment to make sure you have the following supplies. Laying out everything on your work surface prior to mixing will provide more ease as you work quickly.
- Nunn Design Charm
- Wet-wipes
- A flat surface to press the silicone putty into a flat disk
- A Ziploc Bag or piece of plastic
Step 7. Knead both part A and part B of the EasyMold Silicone Putty together until blended completely. The putty should be uniform in color.

Step 8. Roll the fully mixed EasyMold Silicone Putty into a smooth round ball that is free of creases. Place the mixed putty onto a piece of plastic. If you have creases, try your best to have the smoothest side of the mixed silicone ball facing up.

Step 9. Use one of the lids from the containers of EasyMold Silicone Putty or a flat surface, such as a glass bowl, to press down into the silicone putty. Creating a nice round and evenly flat disk out of the silicone putty.

Step 10. Press the slightly oiled Nunn Design Charm into the molding putty right away (it sets up really fast!). Use the lid of the putty or a flat surface to press the faceted charms firmly and evenly down into the Easy Mold Silicone Putty.


Step 11. Quickly remove the button and press in your bezel in a position that frames the impression of the button nicely. The loop of the bezel should be at the top of your framed impression, allowing you to have a perfect registration with each imprint. Leave the bezel in the putty while it sets-up.

Step 12. The Easy Mold Silicone Putty will start to set and be firm to the touch after 20 minutes. Remove the bezel from the putty by bending back the sides, it will easily pop out.
Step 13. Wipe down the mold with a wet-wipe and store for your next creative project.

Repeat steps with different bezels!
Mix Epoxy Clay:

Step 14. Epoxy Clay is a 2-part epoxy. Mixing equal parts of A & B activates the clay. Once the clay is activated you have 90-120 minutes before the clay hardens and you can no longer sculpt or embed objects. Prior to mixing the 2 parts, it is recommended by the manufacturer to wear gloves when handling. Once the clay is mixed it is activated and is neutral and gloves are no longer necessary.
The gloves that are included in the Epoxy Clay 50gr Kits are not my favorite. They are way too big for my hands and I have a heck of time mixing and the clay while wearing them. If you are having the same challenge try a different brand. If you do not have a latex allergy, I recommend using a pair of industrial, powder-free, 5 mils, latex glove sized to fit your hand snugly.
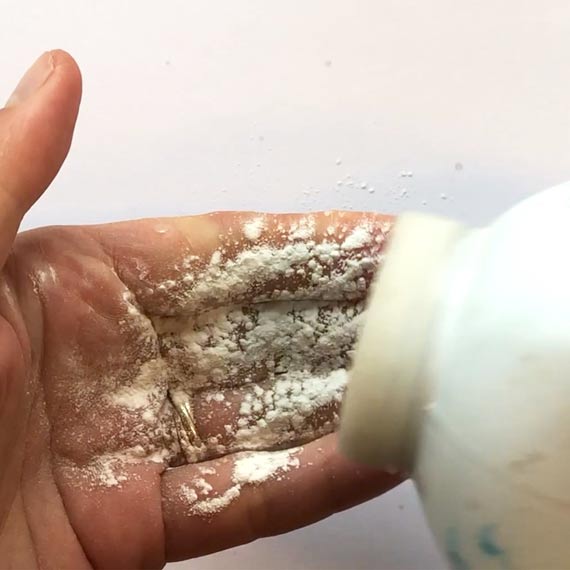
I use my latex gloves over and over again to prevent waste. To get the most usage out of the gloves, place baby powder generously over your hands prior to putting the gloves on. This will make it easier to get the gloves off once you are finished mixing the Epoxy Clay.
Step 15: With the gloves on, open up the packages of Epoxy Clay and pinch off two equal-sized balls of Part A and Part B. Blend together the 2 parts fully until the clay is no longer marbled and is uniform in color.

Tip: I guesstimate the amount of Epoxy Clay that I will need to fill the bezels for the project I’m working on. I would recommend having plenty of bezels prepped just in case you have excess clay.
Tip: Make sure to wrap up your Epoxy Clay to prevent it from drying out and hardening. Store Part A and Part B in separate zip-lock bags to avoid contamination while it is in storage.
Step 16: Once the clay is mixed, you can safely handle the clay without wearing gloves. Prior to removing the gloves, use a wet-wipe to clean them fully. Store the gloves for your next creative jewelry making project.
Use a wet-wipe to also clean your hands of any baby powder prior to handling the clay.
Apply Epoxy Clay into the Nunn Design Bezels

Step 17. Roll the thoroughly mixed Epoxy Clay between your palms until it forms a smooth round ball.
Step 18. Press the ball of mixed Epoxy Clay into your bezel using the tips of your fingers. Since I will be pressing the silicone mold into the clay, I wanted the Epoxy Clay to be slightly domed so it can create a good impression.


If filling the corners with Epoxy Clay is challenging, use a toothpick to press the clay up into the corners of the bezel. Pat the toothpick marked clay with your fingers until smooth.

Step 19. Use a wet-wipe to clean-up any excess Epoxy Clay that might have been left on the jewelry finding. The Epoxy Clay hardens like cement, so cleaning it up now and being tidy as you go makes the process easier and the results so much nicer.
Step 20. If you have fingerprints in your clay, or if you want the surface to be smoother than you have, wet your fingers slightly with water and rub the Epoxy Clay. The water will help smooth the clay.

Create an Impression into Epoxy Clay with a Silicone Mold

Step 21. Place the bezel of Epoxy Clay face down onto the silicone mold and press down evenly. To make sure I have a really good impression, I like to pick up the mold and press the mold into the clay, as well as pressing the bezel down into the mold.


Step 22. If you don’t like the impression that was created, pat the impression in the Epoxy Clay with your fingertips until you have a smooth surface once again.
Step 23. Clean the side edges of bezel thoroughly with a wet-wipe, removing any of the Epoxy Clay. The Epoxy Clay will harden like cement, so cleaning as you go is a good habit to get into.

TIP: Before storing your silicone molds, wipe it down with a wet-wipe. This will allow you to have a clean mold for the next time.
Step 24. Let the Epoxy Clay cure for 12 hours. It will be hard to the touch, but will continue to fully cure for another 72 hours.


How to Mix Nunn Design 2-Part Resin
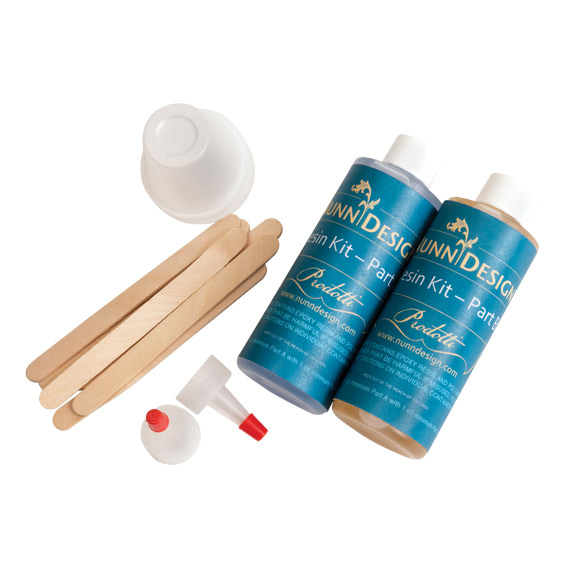
The Nunn Design Resin Kit contains:
A 4-ounce bottle of clear epoxy resin
A 4-ounce bottle of epoxy hardener
2 precision tips to screw onto the bottles
5 mixing cups
5 mixing sticks
Printed instructions on how to mix the resin
Step 25. Read the resin instructions for safety concerns regarding the Nunn Design Resin. Put on your latex gloves and I would recommend safety glasses. I wear readers so I think that my eyes are protected. Make sure you have a pile of wet-wipes on the ready!
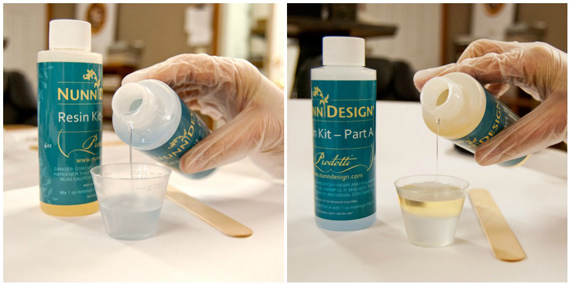
Step 26. To mix the resin you’ll want to have an exact one-to-one ratio. The one-to-one ratio has to be one tablespoon of Part A first and one tablespoon of Part B. This is a volume thing, not a weight thing. You have to mix the full mixing cup of resin to have the resin properly activate. I thought this was an excuse to get me to use more resin, but trust me, it isn’t! It is important to pour Part A first into the cup and then Part B. It is a chemical thing about part A being heavier or something.
Place one of the mixing cups included in the Nunn Design Resin Kit onto your table. I suggest getting your eyes level with the resin so you can see the lines on the measuring cup. Remove the lid to Part A of your resin kit and slowly pour the resin into the mixing cup up to the 1 Tablespoon mark. I suggest that you go slow until you start to gain more confidence. When you start to get near the 1 Tablespoon line, tilt the Part A bottle down, slowing the flow of the resin. Slowly drizzle the resin into the cup until you have hit the 1 Tablespoon mark EXACTLY! To end the flow of the resin, twist the bottle. Use a wet-wipe to fully clean up resin from the edge of the bottle. Make sure to put the Part A lid back onto the resin bottle.
I fold my wet-wipe over to make sure I don’t contaminate Part B when I clean up the edge of that resin after I pour it. I am also making sure that I don’t get any of the resin onto my hands.
Following all the same steps used for Part A, pour Part B into the mixing cup until it is EXACTLY at the 2 Tablespoon mark. Clean up the edge of the resin bottle and securely twist the Part B cap back onto the resin.
Step 27. Set your timer for 2 minutes. Using the stir stick from your Nunn Design Resin Kit, slowly and carefully stir your resin scraping the bottom of the cup and the sidewalls as you stir. Go slowly because it is easy for the cup to overflow. I hold the cup down at the base and use my fingers to help rotate the cup around. Stop from time to time and scrape the resin from the sides of the stir stick and continue to stir for the full 2 minutes. If your resin is still cloudy after your timer has gone off, continue to mix until clear.

After mixing is complete and your resin is clear, scrape both sides of your stir stick on the edge of your resin filled cup.
Another habit that I have developed is being aware of where I rest my stir sticks. To avoid getting resin all over my work surface, I like to rest the resin stir sticks in one of the mixing cups or onto a small Ziploc. I can easily peel the resin off of the Ziploc and reuse it. I can also reuse my stir stick once the resin has fully cured. I do know people who wipe out and reuse their mixing cups, but I haven’t done that so I cannot recommend it.
How to Colorize Nunn Design 2-Part Resin with Castin’ Craft Opaque Pigments
Step 28. For this tutorial, I used Nunn Design Resin and Castin’ Craft Opaque Pigments in Blue, Black, White and Yellow to create Pantone 14-4502.

Pantone 14-4502
Formula:
- 1 Large Toothpick White
- 1 Tiny Toothpick Black
- 1 Spec Blue
- 1 Tiny Toothpick Yellow
To create 2017-2020 Pantone Colors, download the Pantone Color Formula Cheatsheet!
Step 29. To colorize the resin, place another empty resin mixing cup onto your work area. Pour the clear, mixed resin into the cup, filling it to the 1 TSP (you may need more of the full TBSP mixed, but you can easily colorize more).
Step 30. Follow the formula and add Castin’ Craft Opaque Pigment colorants into the clear mixed Nunn Design Resin and mix fully until blended.


TIP: Be sure that the colorant does not equal more than 10% of your resin as having more than 10% could cause issues with curing.
Applying the Colorized Resin
Step 31. I tend to work in a small area (typically my kitchen table), so I like to work on a surface that projects can be easily moved around and not disturbed. Place some business cards or some heavy card stock onto your work surface, making it easy to move the pendants without getting any resin on your fingers.
TIP: I would recommend covering the card with glossy packing tape. This will prevent the resin from sticking to the paper.
Step 32. Drizzle a small amount of colorized resin onto the cured Epoxy Clay. Agitating the resin will help dislodge any air bubbles lurking below the surface. Continue to drizzle the colorized resin until the bezel is domed.

Using a stir stick or toothpick drag the resin over to the side edges. You can also use the stir stick to remove excess resin.
Step 33. Use a wet-wipe to remove the colorized resin for the high points of the impression. Clean off any resin that might be on the sides of the bezel.
Step 34. If you would like to add additional colorized resin in areas that need it, use a toothpick to apply and move the resin around.

How to Babysit Your Curing Resin
Step 35. If you see bubbles rising to the surface, using your hot breath, breathe on them. It isn’t a “blow” sort of breath – more of a “huff” sort of breath. The hot air will make the bubbles expand, rise to the surface and pop. As the resin starts to set-up and becomes thicker, it will be more difficult for the air to rise to the surface. Make sure to check in on the curing resin and double check for air bubbles. If you do have some bubbles that won’t pop with your “huff”, use a toothpick to gently drag them over to the sides. This agitation process will help them to pop. When the resin is thick and taffy-like in texture it is time to let it be. If you attempt to pop bubbles at this time, you may end up with a gooey mess.
Step 36. If you have resin that has over-poured, wait about 6-12 hours until the resin is at its “soft cure” phase. Use a pair of needle nose pliers to bend back the resin from the bezel. The resin will easily separate and peel off of the bezel.
Step 37. Let the resin cure for 12-14 hours. The resin will be hard to the touch but will continue to cure for the next 72 hours.

How to Clean Up Resin Overflows
Step 38. If you have resin that has over-poured or seeped under the Open Back Hoop and onto the card, wait about 12-18 hours until the resin is at its “soft cure” phase. Remove the hoop from the card. The resin will still be non-tacky but still flexible. Use a pair of needle-nose pliers to bend back the resin from the hoop. The resin will easily separate and peel off of the hoop.
TIP: It may take longer than 12-18 hours depending on your room temperature. You will want the resin to be firm, but not super hard.
Design Option: Open Back Bezels

If you are using Open Back Bezels, there will be a few additional steps.
Packing Tape:
Step 1. To create a solid backing for the Nunn Design Open Back Bezel that we are using in this tutorial, cut a piece of packing tape and place it on your work surface. Place the Open Back Bezel onto the tape. To make sure the tape is burnished down and fully attached, use your fingertips to press the bezel down onto the packing tape and rub back and forth on your work surface. If it isn’t fully attached, the clay will seep out from underneath the sidewalls of the bezel.
Tip: Check to see that your packing tape is clear and there is no residue or mottling in the adhesive. If there is, it will show up on the backside of your finished Epoxy Clay piece when you remove the tape once the clay is cured. Try to use an area of the tape that does not have blotches or marks. If you are curious about other tape options, you might be interested in reading this blog post.

Step 2: Trim away excess packing tape from around your Open Back Bezel to avoid the curing clay piece from potentially being disturbed.
Repeat Steps Above
Repeat the above steps to Make a Mold, Mix Epoxy Clay, Insert Epoxy Clay, Mix & Colorize Nunn Design Resin.
Step 3: When following the steps above on how make a mold, do not make a bezel registration.


Remove and Clean the Tape Off Cured Epoxy Clay
Step 4. To finish your Open Frame, remove the packing tape from the backside once fully cured. If you have any excess residue from the packing tape on the backside of the resin, use the tape to remove it like you would when you are removing lint or animal fur from your clothes. Keep touching the packing tape onto the sticky surface until it is no longer sticky.

Step 5. If the residue isn’t coming up, try Goo Gone! Follow the manufacturer’s instructions for the best results. I applied a couple of drops on the backside and let it sit for over a minute. I then used a stir stick to scrape the tape residue. To remove all that sticky mess, pour some rubbing alcohol onto a wet-wipe and wipe it away.

Shop Wholesale Nunn Design Findings
Shop Nunn Design Wholesale
Nunn Design has been supplying jewelry artists with findings for over 20 years. Shop wholesale jewelry findings for creative jewelry makers.
Shop Nunn Design!How to Purchase Wholesale?
If you are interested in becoming one of the many designers who trust their jewelry to Nunn Design Findings, please join us by registering to become one of our wholesale customers!
Please visit our Where to Buy Page for a listing of online stores that sell Nunn Design Findings retail.

If you enjoyed reading this post, please subscribe to our blog. Here are 10 Reasons Why to Subscribe and a place to do so!