


Creating knotted beaded bracelets with waxed linen thread is still a popular jewelry trend. I mean, what is there not to love about this look! They are sophisticated enough for even the more advanced jewelry designer while simple enough for a person new to knotting, like me.
Knot Lost Bracelet Tutorial
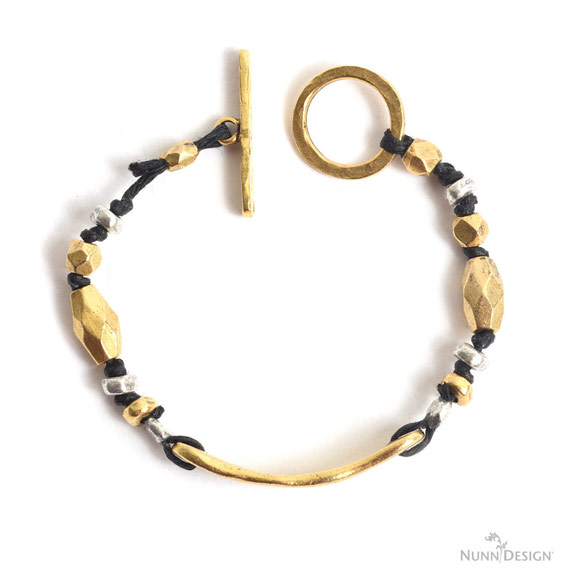
In this tutorial, we start in the center and knot our way to the toggle and clasps on the ends.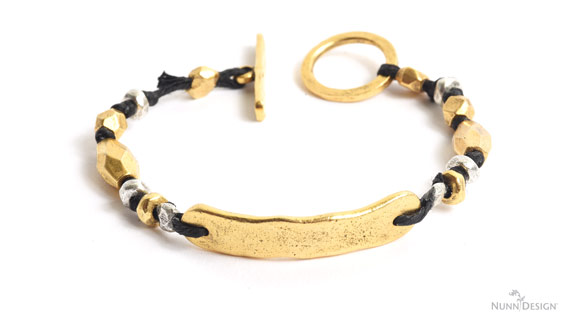
Knotted bracelets using a 12 ply Crawford Linen Thread and Nunn Design Cast Pewter Beads are a perfect combination. The 12 ply allows for just the right knot size and the wide-holed Nunn Design Cast Pewter Beads are a perfect proportion for the knot.
Supplies:
Supplies Needed:
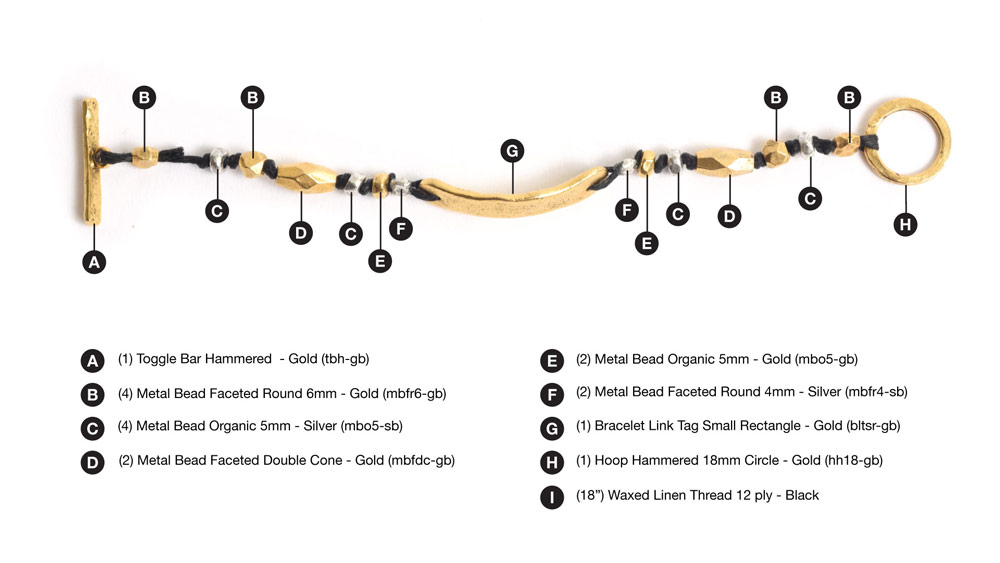
(1) Toggle Bar Hammered – Gold (tbh-gb)
(4) Metal Bead Faceted Round 6mm – Gold (mbfr6-gb)
(4) Metal Bead Organic 5mm – Silver (mbo5-sb)
(2) Metal Bead Faceted Double Cone – Gold (mbfdc-gb)
(2) Metal Bead Organic 5mm – Gold (mbo5-gb)
(2) Metal Bead Faceted Round 4mm – Silver (mbfr4-sb)
(1) Bracelet Link Tag Small Rectangle – Gold (bltsr-gb)
(1) Hoop Hammered 18mm Circle – Gold (hh18-gb)
(18”) Waxed Linen Thread 12 ply – Black
Tools Needed:
Flat Nose Pliers
Scissors
A ruler
Optional:
Round Needle Nose Pliers
Shop the supplies for this bracelet!
Fast & Long Tutorial Videos:
Watch this Fast Video For a quick overview of the process and then read the full tutorial below!
Watch the full tutorial video where I walk you through the whole process.
Learn How:
Step 1:
To create a knotted bracelet 7 1/2” in length, use a pair of scissors to cut 18” of 12 ply Crawford Linen Thread. Cut the 18” in half to create two strands of 9” waxed linen thread.


Step 2:
Using your fingertips, rub the waxed linen thread to create a nice point on one end of one of the 9” strands. Bead a Faceted Round 4mm Nunn Design Bead onto the thread. Insert the linen thread through the top part of the Bracelet Link Tag Small Rectangle and back through the Faceted Round 4mm Bead.


TIP: If you are having a heck of a time getting the Crawford Linen Thread to go back through the 4mm bead, use a pair of round needle nose pliers to “ream” the bead slightly. This will help expand the hole of the pewter bead.

Step 3:
Slide the bead (with both strands of waxed linen thread through it) toward the Bracelet Link Tag. Allow for a 1/2” of a gap in between the bead and the Bracelet Link Tag.
Step 4:
With this next step, crimp the bead with a pair of flat nose pliers to secure the closure of the waxed linen thread. Place the Faceted Round 4mm Bead into the widest area of the “jaws” of the flat nose pliers. Squeeze the pliers to flatten the bead.

TIP: Pewter is a very soft metal. You will not need to crimp really hard. Crimp lightly and then do a pull test to see if the crimp is secure. If it isn’t, crimp again with applying a little more pressure on the bead.
Step 5:
To trim the excess waxed linen thread, separate the two threads and use a pair of scissors to cut the excess end of the thread right next to the crimped bead.

Step 6:
Right next to the crimped bead, create an overhand knot. Use your fingers to position the knot right next to the bead prior to pulling firmly thus tightening the knot.


Step 7:
Repeat adding and knotting beads. From the start of the Bracelet Link Tag to the end of the beaded area will be approximately 1 3/4”.

Step 8:
Thread on a Faceted Round 6mm Bead, then thread on the toggle ring. Thread the end of the waxed linen thread through the Faceted Round 6mm Bead once again. Pull on the loose end of the thread until there is about 1/2” of a gap between the last knot and the 6mm Bead. We aren’t going to crimp the bead just yet. We will wait until after we are done knotting the second side.

Step 9:
Repeat steps 2 through 8 to create the second side of the bracelet. Once the second side is knotted to the length of approximately 1 3/4” thread on a Faceted Round 6mm Bead. Thread on the toggle ring. Loop the waxed linen thread back through the final bead and thread through the Faceted Round 6mm Bead. Pull on the thread until there is approximately a 1/2″ gap of thread between the last knot and the waxed linen thread.


Step 10:
Place a ruler onto your work surface. Lay the bracelet down next to the ruler. Double check that the total length of the bracelet is 7 1/2”. You will want both ends to be about 1/2” from the last knot to the 6mm Faceted Bead.

Step 11:
Use the wide section of the flat nose pliers to crimp down on the Faceted Round 6mm Bead securing it to the waxed linen thread on both ends of the bracelet.

Step 12:
To trim the excess waxed linen thread, separate the two threads and use a pair of scissors to cut the excess end of the thread right next to the crimped bead.

Step 13:
Total awesomeness! I’m crazy about wearing several of these bracelets all stacked together!

Design Options!
Here are several options for mixing this tutorial up with a different center focal and various Nunn Design Beads, toggles and clasps.


Shop Knotted Bracelet Supplies!
Shop below for Nunn Design beads, bracelet links, jumprings and connectors for your knotting jewelry!
For the month of April, we’ve added Crawford Waxed Linen Thread 12 ply to the line, while supplies last! The minimum quantity to purchase is 10 feet.
- Crawford Waxed Linen Thread 12 ply
Chocolate - Crawford Waxed Linen Thread 12 ply
Black - Metal Beads
- Bracelet Links
- Jump Rings
- Lobster Clasps
- Toggle Clasps
- Ribbon End Leather Connectors
Shop Nunn Design Wholesale
Nunn Design has been supplying jewelry artists with findings for over 20 years. Shop wholesale jewelry findings for creative jewelry makers.
Shop Nunn Design!How to Purchase Wholesale?
If you are interested in becoming one of the many designers who trust their jewelry to Nunn Design Findings, please join us by registering to become one of our wholesale customers!
Please visit our Where to Buy Page for a listing of online stores that sell Nunn Design Findings retail.

If you enjoyed reading this post, please subscribe to our blog. Here are 10 Reasons Why to Subscribe and a place to do so!