


Tutorials
Colorizing Brass Stampings with PearlEx Powders and Nunn Design Resin

We’ve been playing with Pearl Ex Powders in some projects lately and realized we’ve shared this tutorial in PDF form, but not a full out blog tutorial! What? Better late then never, right?!
So, here it is from our archives but still timeless and inspiring, a beautiful tutorial from past Innovation Team Member, Stephanie Gard Buss. She put together these step-by-step instructions and photos of how to add Pearl Ex Powders to Nunn Design Resin to create this colorized metal look. Bee-eautiful huh?
Learn How:
Materials Needed:
- Nunn Design Resin Kit (reskit)
- 1 Brass Stamping Grande Bumblebee (megbb-bb)
- 1 Ornate Flat Tag Regiment Single Loop (oftr-sb)
- GS Hypo Cement (gshypo)
- Pearl Ex Powder

Other Supplies:
- A paper plate (to use as a palette for mixing)
- Fine Sandpaper, polishing pad or soap and water (to clean brass stampings)
- A large garbage bag (for a work surface)
Step 1:
Begin by mixing your resin.
Read the resin instructions for safety concerns regarding the Nunn Design Resin.
When I work with resin, I always:
- Place a large plastic bag over my work surface and tape it down.
- I make sure I have ventilation in my workroom.
- I wear gloves.
- I wear glasses (readers because I can’t see anymore. Plus it protects my eyes!).
- I have a pile of wet wipes handy.
- This is a great blog post that covers 20 Habits for Successfully Using Nunn Design 2-Part Epoxy Resin. Even if you are a seasoned resin mixer, this might be worth a read.
- You can also watch this great video on How to Mix Nunn Design Resin
Step 2:
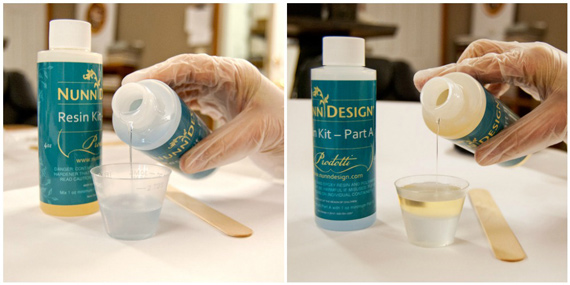
Place one cup (included in the Nunn Design Resin Kit) onto your table. For curing purposes, it is very important that the resin be an exact 1 to 1 ratio of Part A and Part B. I suggest getting your eyes level with the resin so you can see the lines on the measuring cup. Pour Part A of your resin kit up to the ½ fluid ounce mark on your measuring cup. Pour Part B of your resin kit into the same cup until it is filled to the 1 fluid ounce mark. It is important to pour Part A first and then Part B. It is some chemical thing about the part B being heavier or something.
Set your timer for 2 minutes. Using the stir stick from your kit (a popsicle stick or coffee stir stick will work great too), slowly and carefully stir your resin scraping the sides as you stir. Stir for a minimum of 2 minutes. If your resin is still cloudy continue to mix until clear. After mixing is complete and your resin is clear, scrape both sides of your stir stick on the edge of your resin filled cup. Set the mixture under a warm lamp for 5 minutes. I like the lamps with the adjustable arms that can get right down next to the resin. This aids the air bubbles in the resin to rise to the surface and pop.

Step 3:
After your Nunn Design Resin is well mixed and settled, pour a small puddle of the resin onto a paper plate. Scoop a bit of the Pearl Ex Powders onto a craft stick, and mix it completely into the clear resin.


Step 4:
Once you have the Pearl Ex Powder mixed completely into the resin, you will want to let the resin thicken up a bit before using. If the resin is applied too soon, it will still be too thin and run off the edges of the Brass Stamping. I even waited an hour, and it still ran a little, but if you wait too long, it will be too stiff to flow. During this time, clean the Brass Stamping Bee with a wet wipe or roughen up your brass stamping with fine grit of sandpaper. Cleaning and gently sanding will allow the resin to attach to the surface when applied.

Step 5:
Once your resin has thickened and your brass stamping is clean, apply the resin onto a clean stir stick and slowly drizzle the resin onto the bee’s body. If the resin is too runny, just wipe it off with a baby wipe and wait a little while longer for the resin to thicken up and try again. Once the resin is applied on the body of the bee and on the wings, set the bee aside to cure. The curing process can take up to 12 hours.


Step 6:
Using a strong metal glue such as GS Hypo Cement, apply a generous amount to the back of the cured colorized bee. Attach the bee onto an Ornate Flat Tag Regiment and let dry. Once it is dry you can assemble it into your jewelry! Viola!

Be Inspired!
Once you get the bug for colorizing resin and applying it to brass stampings, you can go crazy with personalizing to your color preference!
![]()
![]()
To see more of Stephanie’s work, visit her:
- Etsy: www.etsy.com/people/maxandlucie
- Facebook: www.facebook.com/maxandlucie
- ND Gallery: www.nunndesign.com/designers/stephanie-gard-buss/
Shop the Supplies:
Shop Nunn Design Wholesale
Nunn Design has been supplying jewelry artists with findings for over 20 years. Shop wholesale jewelry findings for creative jewelry makers.
Shop Nunn Design!How to Purchase Wholesale?
If you are interested in becoming one of the many designers who trust their jewelry to Nunn Design Findings, please join us by registering to become one of our wholesale customers!
Please visit our Where to Buy Page for a listing of online stores that sell Nunn Design Findings retail.

If you enjoyed reading this post, please subscribe to our blog. Here are 10 Reasons Why to Subscribe and a place to do so!