


Embroidery, Tutorials
How To Put Your Embroidery in Jewelry + Video!
Blog Update: October 2024 (Original Post Date: April 2018)
Embroidery is a beautiful art form that doesn’t ever seem to go out of style.
I haul around my embroidery supplies on all of our family road trips because my girls are often inspired to “stitch up something.” I admire that they can just dig in and start creating. I find that I get frustrated easily and want to be good at it. My girls just do it because it is fun.
Not all jewelry makers are embroidery artists and not all embroidery artists are jewelry makers.
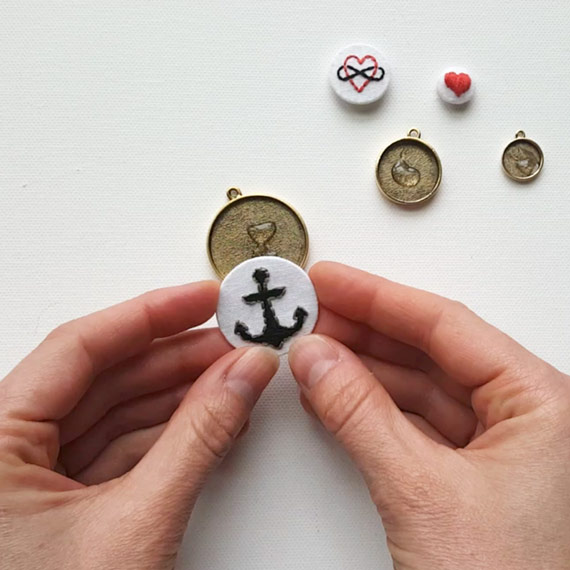
You can see from the following tutorial and video, by Jessica Long, just how easy it is to assemble one-of-a-kind jewelry. In this tutorial Jessica demonstrates embroidering and assembling into the 3 different sizes of pendants, Grande (31mm), Large (21mm), and mini (12mm).
How To Make Embroidered Jewelry
Designer: Jessica Long Embroider
EMBROIDERY 101:
There is a huge variety of embroidery floss on the market, but it is most often commonly found as DMC 6-stranded cotton floss at local US craft stores. You may have used it to make friendship bracelets as a child or found it in a cross-stitch kit. The floss is 6-ply, meaning that it is made up of 6 individual strands of cotton. You can use all six strands or any amount down to a single thin strand depending on your pattern’s instructions and the look you are going for. To separate the strands you should cut your working length of floss first (about 18 inches) and then fray the end to see the individual threads. Pull out one thread at a time, holding the remainder of the threads with your other hand, to best avoid tangles.
EMBROIDERY STITCHES:
There are dozens of different embroidery stitches you can try, but for this beginner project we are going to just use a handful: Split stitch, Satin stitch, Back stitch and Running stitch.
This tutorial goes from small to large in the process, but getting the small embroidery just right can take some practice. Try your hand at the large and medium sizes first to boost your confidence!
Step 1:
Stretch your fabric into your hoop and trim excess fabric from the edges. I like to sandwich my fabric between the lower and upper hoop and then tighten the screw on top. From there I pull the edges of the fabric, moving clockwise along the edge of the hoop until I reach the screw again, which I tighten.

Repeat until your fabric is drum tight and no creases remain. Trim any excess fabric that may interfere with your embroidery.
Step 2:
Using a water and/or air soluble fabric pen, trace the edges of your metal tags onto the fabric. Be sure to leave at least 3/4” between the tags if you will be stitching more than one on this piece of fabric.

Step 3:
Print and trim your embroidery design and tape it behind your fabric, lining up with your traced circle. Hold your hoop up to a bright window or light and trace your design onto the fabric. Remove the taped design when complete.


Step 4:
Pull about an 18-inch length of red embroidery floss from the skein. For the small heart design we will use the full 6 strands. Trim the end of your floss if the fibers are fraying to help with threading your needle. A little lick can help, too. When you stitch you will use the full 6 strands but be careful not to double over and use your tail, too.
Step 5:
Outline the heart in split stitch. To start, come up with your needle at any point along your drawn design (A), leaving an approximately 2-inch tail under the hoop. Hold this tail under your work with your non dominant hand and guide it under subsequent stitches to anchor it. Put your needle back down through the fabric a short distance (2-4mm) along your guideline (B). Your next stitch will “split” this first stitch by coming up through the center of it (C) and then going down again through the fabric a short distance along your guideline (D). Continue this split stitch around your heart until you have outlined the entire shape.


Step 6:
Next, fill the heart shape using satin stitch. Starting at the top of the heart, come up with your thread very close to your split stitch on the outside of the heart outline and go back down at the bottom edge of your heart. This makes a vertical stitch that covers your split stitch outline at either end. Bring your needle up through your fabric and at the top of the heart again, slightly to the right of your previous stitch and repeat, bring the needle back down at the bottom of the heart, running parallel to the previous stitch. Continue until the entire heart shape is filled.


Step 7:
On the backside of your embroidery, run your needle into and through the back of your stitches to anchor the tail of your thread. Trim your tails and be sure to keep your backsides as tidy as possible.
Step 8:
For the medium and large designs you will use only 3 of the 6 strands of embroidery floss. After cutting an ~18 inch piece of floss fray one end to find the individual strands. You can pull out one strand at a time to best avoid tangles.

Step 9:
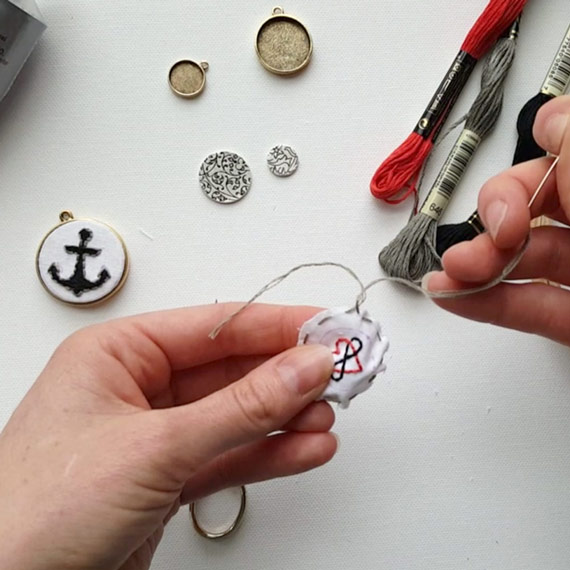
Use back stitch to outline the heart using three strands of red. Be sure to anchor your tail by holding it under your work with your non dominant hand and guide it under subsequent stitches to secure it. Come up with your needle anywhere on your guideline (A) and go back down along your line nearby (B). Come back up short distance along your guideline (C) and go back down into the same hole as your previous stitch (AD). Continue until the entire shape is outlined, anchor the remaining thread and trim your tails. Use 3 strands of black thread to similarly outline the infinity symbol using back stitch.


Step 10:
Outline the anchor with 3 strands of grey using back stitch. You may leave the design as is, or fill the shape with satin stitch using 3 strands of black floss.


Step 11:
Remove your fabric from the embroidery hoop and use scissors to trim your designs. Leave about a 1/4” of excess fabric around your traced circles.

Step 12:
If you used a water soluble fabric pen you should rinse your work under the tap at this time. Lay your work on a towel and continue the steps once your work is dry.
Step 13:
Using 3 strands of any color floss use a running stitch along the perimeter of your circle. Come up with your needle at A and down at B, up at C and down at D. Try to keep an even distance between stitches.

Be sure to leave ~3 inch tails at either end which you will use to cinch your work onto the metal tag.

Step 14:
Turn your embroidery upside down and center the appropriate metal tag on your work. Hold the tag in place while pulling the two tails from your running stitch.

If you find your fabric is warping and not being pulled tight enough over the tag you may need to experiment with the amount of excess fabric and the distance between your running stitches. Confirm that your design is centered before double knotting your tails together to secure your fabric over the tag. Trim the tails and any fabric frays.


Step 15:
Apply a dab of strong glue using a cotton swab or similar to your empty bezel. Do not use too much or it will ooze out! Line up your pendant and press firmly in the center.


Use clamps to keep the pendant evenly secured during the drying process.
Step 16:
Assemble to make a finished piece of jewelry.
Download PDF: How To Make Embroidered Jewelry
Be Inspired!
Here are some beautiful pieces done by talented embroidery artists we’ve collaborated with!
![]()
Credit: Left: Jessica Richter, Right: Jessica Long/Namaste Embroidery

Credit: Britney Grossman/Serene Stitching
![]()
Credit: Jessica Kantrales/McCarolynandCo
Watch How:
You can also watch Jessica, in this short video, that walks you through the process of assembling the pendants. She is featuring Grande sized bezels.
Resources:
If you are interested in learning a couple of embroidery stitches, here are some other resources:
- Jessica often does videos on her Instagram account @jessicalongembroidery that are super addicting to watch!
- Mary Corbet has a great resource of videos and tutorials on her site, Needle ‘n Thread.
Shop Supplies:
Shop Supplies WHOLESALE:
shop now! > wholesale jewelry supplies for embroidery
Shop Nunn Design Wholesale
Nunn Design has been supplying jewelry artists with findings for over 20 years. Shop wholesale jewelry findings for creative jewelry makers.
Shop Nunn Design!How to Purchase Wholesale?
If you are interested in becoming one of the many designers who trust their jewelry to Nunn Design Findings, please join us by registering to become one of our wholesale customers!
Please visit our Where to Buy Page for a listing of online stores that sell Nunn Design Findings retail.

If you enjoyed reading this post, please subscribe to our blog. Here are 10 Reasons Why to Subscribe and a place to do so!
Wonderful piece of work! Thanks for uploading.
XYZ
I loved those waves, trees and pretty much everything. Great
hand embroidery
Thanks for the sharing information for embroidery
Great embroidery its a real joy