


12 Tutorials to Unwrap Creativity, DIY Kits, Transfer Sheets, Tutorials
How to Use Nunn Design Transfer Sheets with Colorized Resin on Flat Tags

Take your charms one step further with a splash of color under the transfer sheet image. This is the 3rd tutorial of our 12 Tutorials to Unwrap Your Creativity!
Here is what you will learn in this tutorial:
- Learn the basics of how to use a Nunn Design Transfer Sheets
- Learn how to print your own transfer sheets
- How to mix and colorize Nunn Design Resin with Castin’ Craft Opaque Pigments
- Learn trouble shooting techniques on how to apply the transfer sheets to a flat surface
Supplies:
Nunn Design Supplies:
- Nunn Design Flat Tags
- Nunn Design 2-Part Resin Kit
- Castin’ Crafts Opaque Pigments
- Nunn Design Transfer Sheets
Other Supplies:
- Wet-wipes
- Toothpicks
- Stir Sticks
- Mixing Cups
- Business Cards or glossy card stock
- Rubbing Alcohol
- Plastic Bags
- Q-Tips
- Paper Towels
- Small bowl with water
Tools:
- Scissors
- Tweezers
Mixing and Colorizing the Nunn Design Resin
1. The Nunn Design Flat Tags are oxidized to provide an aged look to the precious metal plating. The oxidization, when it comes into contact with the resin, could change the color of the resin. To avoid this, clean the flat tags thoroughly prior to application of the resin.
Dip the tip of a Q-Tip into rubbing alcohol and clean away any of the blackened oxidization from the tags surface. Shoot, I just clean the whole things for kicks.

2. I tend to work in a small area (typically my kitchen table), so I like to work on a surface that projects can be easily moved around and not disturbed. Place some business cards or some heavy card stock onto your work surface, making it easy to move the pendants without getting any resin on your fingers.
TIP: I would recommend covering the card with glossy packing tape. This will prevent the resin from sticking to the paper.
3. Read the resin instructions for safety concerns regarding the Nunn Design Resin.
When I work with resin, I always:
- Place a large plastic bag over my work surface and tape it down.
- I make sure I have ventilation in my workroom.
- I wear gloves.
- I wear glasses (readers because I can’t see anymore. Plus it protects my eyes!).
- I have a pile of wet wipes handy.
- This is a great blog post that covers 20 Habits for Successfully Using Nunn Design 2-Part Epoxy Resin. Even if you are a seasoned resin mixer, this might be worth a read.
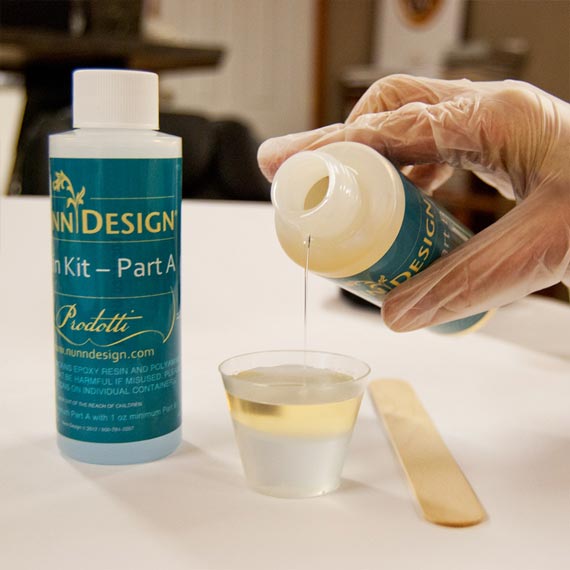
4. Place one cup (included in the Nunn Design Resin Kit) onto your table.
For curing purposes, it is very important that the resin be an exact 1 to 1 ratio of Part A and Part B. I suggest getting your eyes level with the resin so you can see the lines on the measuring cup.
Pour Part A of your resin kit up to the 1 TBS mark on your measuring cup.
Pour Part B of your resin kit into the same cup until it is filled to the 2 TBS mark. It is important to pour Part A first and then Part B. It is some chemical thing about the part A being heavier or something.
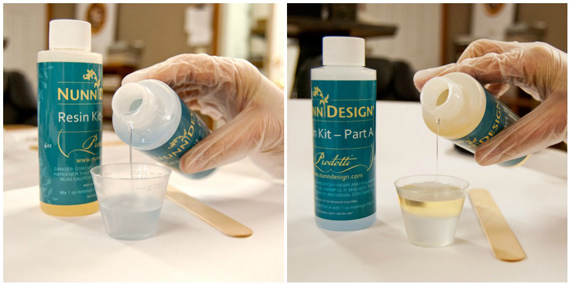
It is important to pour Part A first and then Part B. It is some chemical thing about part A being heavier or something.
5. Set your timer for 2 minutes. Using the stir stick from your kit (a popsicle stick or coffee stir stick will work great too), slowly and carefully stir your resin scraping the sides as you stir. Stir for a minimum of 2 minutes. If your resin is still cloudy continue to mix until clear.
After mixing is complete and your resin is clear, scrape both sides of your stir stick on the edge of your resin filled cup.
Colorizing Resin:
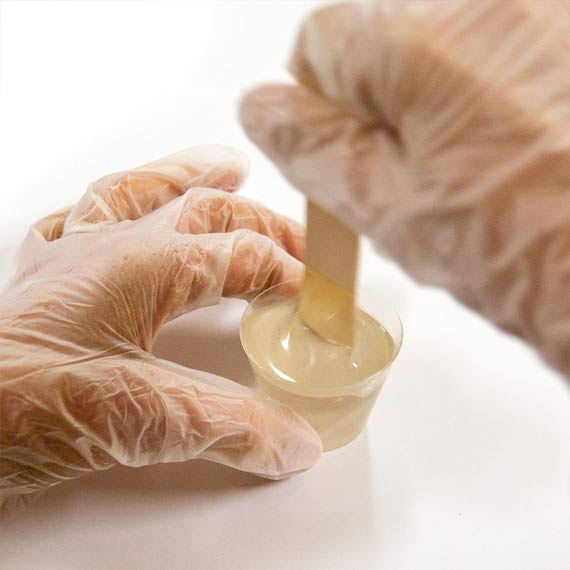
6. To colorize the resin, place another empty resin mixing cup onto your work area.

Pour the clear, mixed resin into the cup, filling it to the 1 TSP mark.

For this tutorial, I colorized my resin with Castin’ Crafts Opaque Pigments to create the Pantone Color-14-4620 TPG, Island Paradise. To create Pantone Colors, take a look at this earlier pdf, Pantone Color Cheat Sheet, to learn how to mix various pigments to achieve a variety of colors.
The Castin’ Craft Opaque Pigments are very potent. Let’s define what a “tiny toothpick tip” and a “toothpick tip” amount of colorant should look like. This is not an exact science. If you don’t get the exact amount, your color will still come out fairly close.

A “tiny toothpick tip” should look like this.
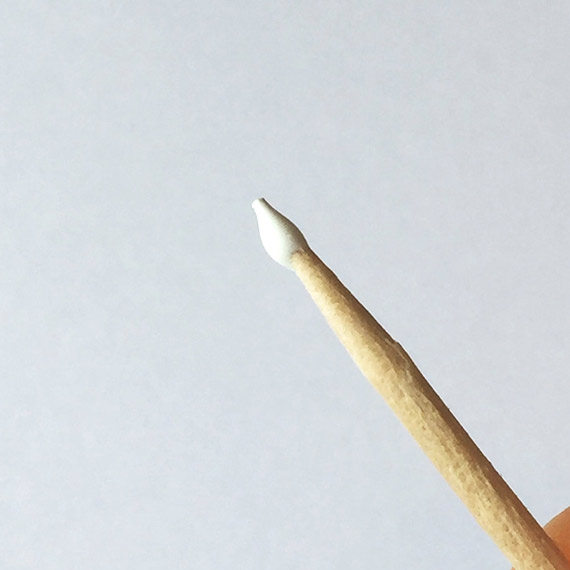
A “toothpick tip” should looks like this.
Add in Castin’ Crafts Opaque Pigment according to the formula provided:

Pantone Color-14-4620 TPG, Island Paradise
Formula:
- 1 tsp Nunn Design Resin
- 1 tiny toothpick tip Blue
- 1 tiny toothpick tip Yellow
- 4 toothpicks tips White
Stir gently until the colorants are fully mixed together. Let resin sit for 5 minutes to let the bubbles rise to the surface and pop.
Tip: Be sure that the colorant does not equal more than 10% of your resin as having more than 10% could cause issues with curing.
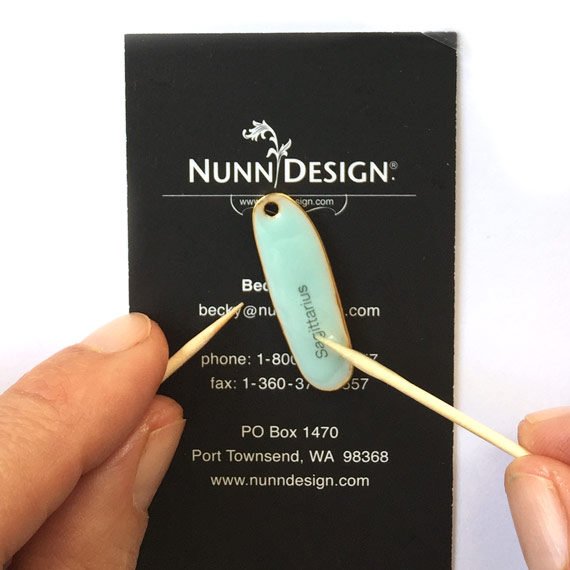
7. Using a toothpick, drizzle a small amount of colorized resin onto the surface of the flat tag.


Drag the resin to the edge of the flat tag with a toothpick. The resin is self-doming and wants to know where the edge is.

Use your toothpick to drag resin up and around the hole of the flat tag. If the hole becomes filled with resin, use two toothpicks to move the flat tag slightly to the edge of the card so that the tension of the resin in the hole will break and the resin will drain.
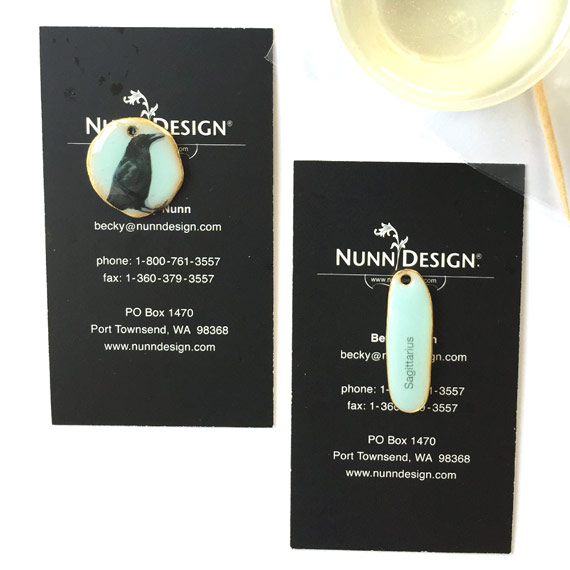
TIP: Apply just enough resin to the surface of the flat tag to cover the full surface, but not so much that it starts to dome. You will want a flat surface of the colorized resin on the tag to apply the transfer sheet image to later in the tutorial.
Clean Up at “Soft Cure” Stage (6 hours)
Step 8: You will want to ‘babysit’ your resin for the next 1 – 2 hours. If you see bubbles rising to the surface, using your hot breath – breathe on them. It isn’t a “blow” sort of breath – more of a “huff” sort of a breath. The hot air will make the bubbles expand, rise to the surface and pop. As the resin starts to set-up and become thicker, it will be more difficult for the air to rise to the surface. Make sure to check in on the curing resin and double check for air bubbles.
9. If you have resin that has over-poured or seeped under the flat tag and onto the card, wait about 6 hours until the resin is at its “soft cure” phase. Remove the tag from the card and apply a couple drops of Goo Gone onto the backside.

Let the Goo Gone sit for 1 minute, then use the end of a mixing stick to scrape and remove the excess resin.


TIP: I could of prevented this mess by having put packing tape on my business card, but I forgot! Clean up is an inconvenience and preventable.
Applying the Transfer Sheet

10. With a pair of scissors, trim one of the images from one of the Nunn Design Transfer Sheet. Continue trimming and adjusting until the transfer sheet image fits nicely onto your tag.
TIP: If you are interested in creating your own transfer sheet images, read on to Step 19!


Make sure that there is no transfer sheet image over hang off the sides of the tag.


11. Fill a small shallow dish with warm water approximately 3⁄4 of the way full. The Nunn Design Transfer Sheets are printed on a film with a paper backing. When the transfer sheet is submerged into water, it separates the film front from the paper backing.

Drop your trimmed transfer sheets into the water and wait 30 seconds. I like to work with one of my transfer sheet images at a time, so I’m not in a rush as all of the backs release from the film fronts at the same time.

The film is very fragile, so be gentle when handling it. When removing the transfer sheet from the water, you will be able to feel the film and paper-backing slide apart from one another when you hold it in between your fingers.

Leave the paper backing attached to the film front and lay the transfer sheet onto a sheet of paper towel. Press down on the transfer sheet to remove any water from the film.

12. You will need to mix-up another batch of clear Nunn Design Resin. Follow steps 3-5.
13. Spread the mixed Nunn Design clear resin over the surface of the flat tags with a toothpick. The resin will provide a layer of moisture between the cured resin and the transfer image. If the resin isn’t on the tag prior to applying the transfer sheet, it is easy to get air trapped under the transfer sheet image.

14. Slide the transfer sheet slightly from the paper backing and place the film into the resin on the flat tag. Hold the film in place on top of the flat tag with a toothpick and slowly remove the remaining paper backing from the transfer sheet.

The film will gently lay down into the pool of resin.

15. Press down gently onto the transfer sheet image with a toothpick, pressing out any excess resin and potential air bubbles from underneath the image. Drag the resin to the edge of the flat tag with a toothpick. The resin is self-doming and wants to know where the edge is. Use your toothpick to drag resin up and around the hole of the flat tag.

If the hole becomes filled with resin, use two toothpicks to move the flat tag slightly to the edge of the card so that the tension of the resin in the hole will break and the resin will drain. Drizzle onto the tag additional resin using your toothpick to create more of a domed effect.


16. You will want to ‘babysit’ your resin for the next 1 – 2 hours. If you see bubbles rising to the surface, using your hot breath – breathe on them. It isn’t a “blow” sort of breath – more of a “huff” sort of a breath. The hot air will make the bubbles expand, rise to the surface and pop. As the resin starts to set-up and become thicker, it will be more difficult for the air to rise to the surface.


17. Let the resin cure. It will start to be hard to the touch in as early as 12 hours, but the resin will continue to cure up to 72 hours.
18. If you have resin that has over-poured or seeped under the flat tag and onto the card, repeat Step 9.

19. To create your own transfer sheet images, you can purchase blank packs of LazerTran Paper!
Here are the links to purchase on Amazon:
For an Ink Jet Printer:

For an Ink Jet Printer: Lazertran Waterslide Decal Paper Lazertran for Inkjet
For a Lazer Printer:

For a Laser Printer: Lazertran Waterslide Decal Paper Regular Lazertran
20. Assemble into something fabulous!
Watch the Video!
Here is a video I filmed with Beadaholique showing how to use the Nunn Design Transfer Sheet with clear resin. Although this tutorial requires an additional step of adding colorized resin onto the base of the flat tag, this video will still give you an idea of the technique and process.
Shop Supplies:
Shop the Supplies Wholesale!
For this tutorial, I used the following Flat Tags:
- Flat Tag Primitive
- Flat Tag Hammered
- Shop all of the Nunn Design Flat Tags
- Nunn Design Transfer Sheets
Shop Nunn Design Wholesale
Nunn Design has been supplying jewelry artists with findings for over 20 years. Shop wholesale jewelry findings for creative jewelry makers.
Shop Nunn Design!How to Purchase Wholesale?
If you are interested in becoming one of the many designers who trust their jewelry to Nunn Design Findings, please join us by registering to become one of our wholesale customers!
Please visit our Where to Buy Page for a listing of online stores that sell Nunn Design Findings retail.

If you enjoyed reading this post, please subscribe to our blog. Here are 10 Reasons Why to Subscribe and a place to do so!