


DIY Kits, Making/Using Molds, Nunn Design Online Classes, Tutorials
Making Molds with Organics to Create Sculpted Resin Tutorial + Video
![]()
What You Will Learn:
Making Molds with Organics to Create Sculpted Resin
This tutorial is one of those fun techniques discovered while trying not to panic about my “resin window” closing and the mixture becoming too thick to use. It involves making and creating your own mold using organics, such as leaves, and pouring the resin into open back bezels that are placed onto the mold’s surface texture.
In this class you will learn:
- How to make a mold
- How to create a mold using organics
- How to mix resin
- How to clean and finish you resin cured pendants
![]()
Supplies Needed:
Nunn Design Supplies:
Other Supplies:
- Easy Mold Silicone Putty
- Some fresh organics such as a leave or grass
- Q-tip
- Wetwipes
- Toothpicks
- Business Cards
Watch Quick 1 Minute Tutorial Video!
Step 1:
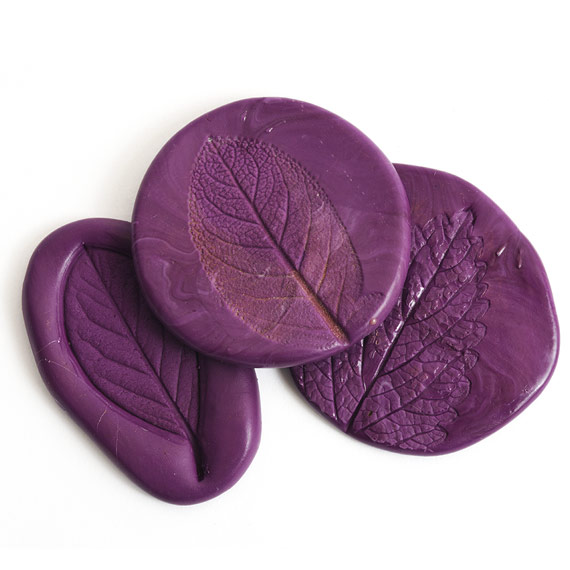
The first step is going to be making a silicone mold with Easy Mold Silicone Putty. Read the full step-by-step tutorial in our previous blog post here: How to Make a Mold with Organics Tutorial.
IMPORTANT TIP:
Make sure that after you have removed the organics from the silicone putty, that you allow for the mold to set for 24 hours. The silicone putty will continue to off-gas within this period. If you do use Nunn Design Resin right away within the mold prior to allowing the mold to set, air bubbles will release into the resin.
Step 2:
The Nunn Design Findings are oxidized to provide the antique look to the precious metal plating. The oxidization, when it comes into contact with the resin, could change the color of the resin. To avoid this, clean the bezels thoroughly prior to application of the resin. Dip the tip of a Q-Tip into rubbing alcohol and clean away any of the blackened oxidization from the surface. Shoot, I just clean the whole thing for kicks.
Step 3:
Read the resin instructions for safety concerns regarding the Nunn Design Resin.

When I work with resin, I always:
- Place a large plastic bag over my work surface and tape it down.
- I make sure I have ventilation in my workroom.
- I wear gloves.
- I wear glasses (readers because I can’t see anymore. Plus it protects my eyes!).
- I have a pile of wet wipes handy.
- This is a great blog post that covers 20 Habits for Successfully Using Nunn Design 2-Part Epoxy Resin. Even if you are a seasoned resin mixer, this might be worth a read.
Step 4:
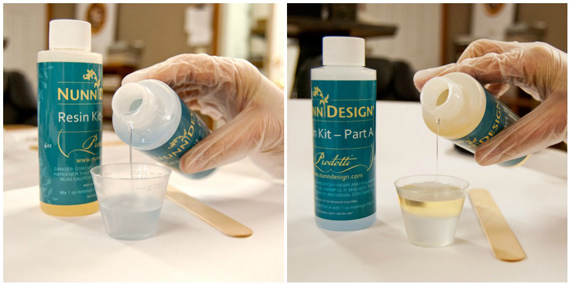
Place one cup (included in the Nunn Design Resin Kit) onto your table.
For curing purposes, it is very important that the resin be an exact 1 to 1 ratio of Part A and Part B. I suggest getting your eyes level with the resin so you can see the lines on the measuring cup.
Pour Part A of your resin kit up to the ½ fluid ounce mark on your measuring cup.
Pour Part B of your resin kit into the same cup until it is filled to the 1 fluid ounce mark. It is important to pour Part A first and then Part B. It is some chemical thing about part A being heavier or something.
Step 5:
Set your timer for 2 minutes. Using the stir stick from your kit (a popsicle stick or coffee stir stick will work great too), slowly and carefully stir your resin scraping the sides as you stir. Stir for a minimum of 2 minutes. If your resin is still cloudy continue to mix until clear.
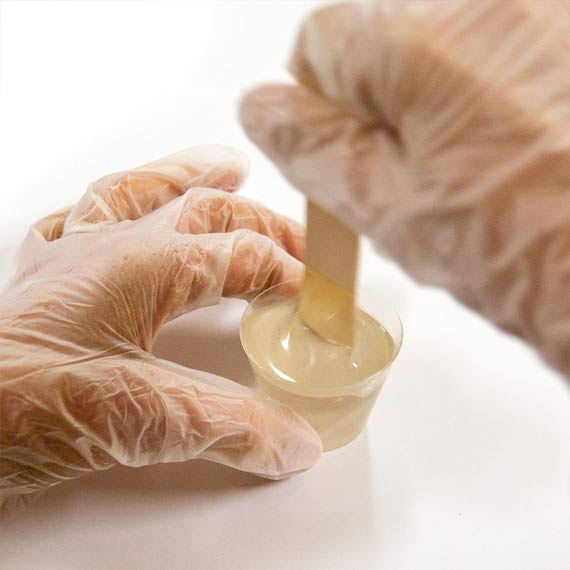
After mixing is complete and your resin is clear, scrape both sides of your stir stick on the edge of your resin filled cup.
Step 6:
In order for the resin to not seep out from under the edge of the Open Frame Bezels, the resin needs to be really thick before applying it bezels.
Lay the cleaned bezels onto the silicone molds. Scoop the thick resin into the bezels and use a toothpick to move the resin around. Agitate the resin along the edge of the Open Frame Bezels, causing air that might be trapped in those areas to dislodge and rise to the surface of the resin.


Step 7:
Babysit the curing resin for the first 1-2 hours. If you see bubbles rising to the surface, using your hot breath, breathe on them. It isn’t a “blow” sort of breath – more of a “huff” sort of a breath. The hot air will make the bubbles expand, rise to the surface and pop. As the resin starts to set-up and become thicker, it will be more difficult for the air to rise to the surface.
Step 8:
Let the resin cure on the silicone molds for 6 hours or until the resin is firm to the touch. If the resin is too soft and slightly tacky, wait an hour and try again. This stage of the curing resin’s process is referred to as the “soft cure” stage.
Step 10:
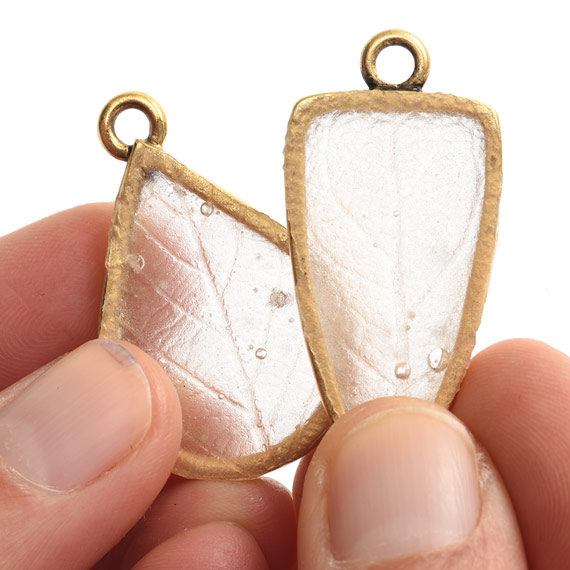
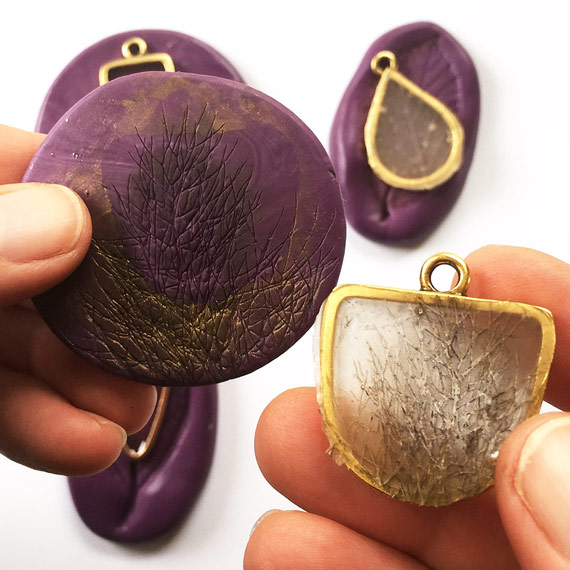
Once the resin is firm to the touch, bend back the molding putty at one of the edges of the Open Frame Hoop, peeling it away from the resin. You will know the resin is ready to release and peel away from the silicone mold when you start to see the resin turn lighter in color. It is doing this because it is releasing from the silicone mold.


Step 11:
For this pendant, I used a Q-Tip to smear a bit of PearlEx Powder onto the mold prior to pouring in the mixed resin. It provided an interesting design in the resin.
Step 12:
If you did have any resin seep out from under the open back bezel, use a pair of scissors or flush cutters to cut away the excess resin. Make sure to wipe down your scissors after cutting to remove any resin bits.

Step 13:
If your resin has sharp edges, use a #0000 super fine steel wool to lightly sand the areas.
Watch Video!
Watch the full class video where I walk you through the whole process!
Shop Nunn Design Wholesale
Nunn Design has been supplying jewelry artists with findings for over 20 years. Shop wholesale jewelry findings for creative jewelry makers.
Shop Nunn Design!How to Purchase Wholesale?
If you are interested in becoming one of the many designers who trust their jewelry to Nunn Design Findings, please join us by registering to become one of our wholesale customers!
Please visit our Where to Buy Page for a listing of online stores that sell Nunn Design Findings retail.

If you enjoyed reading this post, please subscribe to our blog. Here are 10 Reasons Why to Subscribe and a place to do so!