


Tutorials
Part 5 of Exploring New Techniques with Resin
Welcome to Part 5 of a multiple part series on exploring Resin.
Welcome to the final part in our series on exploring new techniques with Nunn Design 2-Part Resin. Throughout this series, I have been documenting and sharing my creative process as I explore new mediums. I hope that you have found this series inspiring.
Now let’s take a look at what is up next!
PART 5 – EXPLORING NEW TECHNIQUES WITH RESIN

THE EXPLORATION:
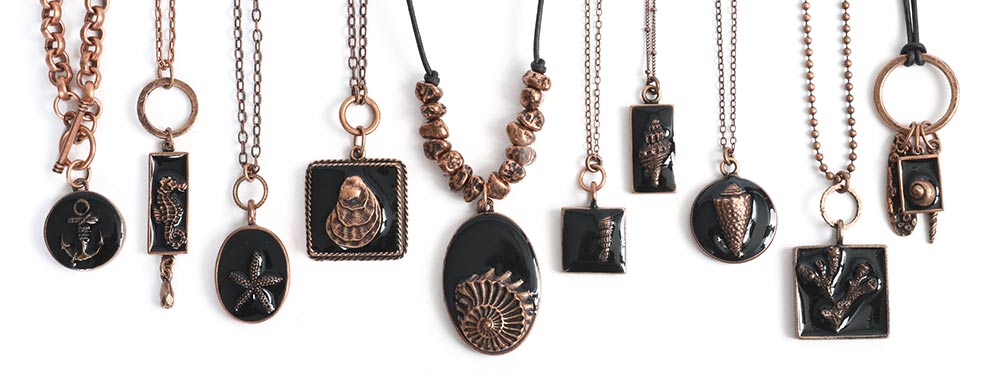
I really love the look of specimen boxes and thought it would be fun to try to create that look using Nunn Design Bezels and Charms.
It wasn’t until I had finished the project did I step back and think, “hey, that kind of looks like a lot of sea-life stuck in black tar!” That was not the look I was going for!
The experiment did help me learn the “how-to,” it was just the color that I wasn’t happy with. I had Melissa play around in Photoshop to help me see what the pieces would of looked like if I had used a different plate of Nunn Design Findings and different Pantone colors.
THE HOW-TO:
Here is a quick and brief explanation of what I did to create this look:
- Clean Nunn Design Bezels and Charms with rubbing alcohol.
- Mix a batch of black Epoxy Clay and press it down into the base of the clean bezels.
- Using a pair of flush cutters, cut off the loop from the Nunn Design Charms.
- Press the charm down into the Epoxy Clay.
- Use a wet-wipe to clean away any clay. It will harden like cement, so cleaning as you go.
- Mix a batch of Nunn Design 2-Part Resin.
- Add a wee bit of black Castin’ Craft Opaque Pigment into the resin and stir until fully blended. Use the Pantone Cheatsheet to explore other color formulas to create.
- Drizzle over the top of the black Epoxy Clay the colorized black resin. With a toothpick, go along the edge of the bezel and charm where the Epoxy Clay is in contact with the resin. This is typically where air bubbles will lurk, so by agitating the resin, you will dislodge them. Continue to add the colorized resin until it has reached a level that you like.
- Let the resin cure. It will be hard to the touch in 12 hours, but will take 72 hours to be fully cured.
BUT WHAT IF I…
Here are the samples of other color options that Melissa created in Photoshop. I do like my black tar pieces, but I don’t think they’d go over well. What do you think?


SHOP THE SUPPLIES:


IT’S A WRAP!
I hope you have enjoyed following along on my creative journey. Visit the Nunn Design Blog to see the other posts in this five part series.
In Part 1 I had accidently discovered that pure metal powders, a product that I had purchased to use with Epoxy Clay, worked amazing well with Nunn Design 2-Part Resin.
In Part 2 I was curious on how I could add visual interest through imagery. On a couple of the pieces I rubber stamped the surface of the pure metal powders to provide that visual interest I was after, but on the others, I took a pair of scissors and started to scratch the surface of the resin to create the lines. I placed the sharp point of the scissors into the resin and dug into the resin to create the dots.
In Part 3 I explored using transfers and collage sheets.
In Part 4 I explored creating a look similar to the look of natural stones There were a couple steps to create this look, but each piece is a work of art.
Shop Nunn Design Wholesale
Nunn Design has been supplying jewelry artists with findings for over 20 years. Shop wholesale jewelry findings for creative jewelry makers.
Shop Nunn Design!How to Purchase Wholesale?
If you are interested in becoming one of the many designers who trust their jewelry to Nunn Design Findings, please join us by registering to become one of our wholesale customers!
Please visit our Where to Buy Page for a listing of online stores that sell Nunn Design Findings retail.

If you enjoyed reading this post, please subscribe to our blog. Here are 10 Reasons Why to Subscribe and a place to do so!
I like the black, as I think it looks classy. But I love the other colors as they enhance the ocean theme.
I think I like the black best (of the 3). It’s like fancy black patent leather shoes and gold jewelry – very dressy. The 2 other colors are less distinct. For me, a real, pure turquoise color would work. There’s a stone called sleeping beauty turquoise, noted for its solid, light blue color. That would look sharp!
The black is stunning! I dont really like the pastel look of the blue and green.
I love the black! Rather than calling it black tar, perhaps call it enamel. It looks like Japanese enamel boxes.
So true! It is all in the choice of words!
What epoxy clay are you using?