


Nunn Design Online Classes, Transfer Sheets, Tutorials
Make These with Colorized Resin & Transfer Sheets

Although we have done several tutorials and videos on how to use resin and transfer sheets, we have not yet done this exact combination of techniques. In this tutorial, we will be using an open back bezel, translucent colorized resin with a transfer sheet. A couple of different tweaks and such a different look as a result!
In this tutorial you will be learning:
- How to mix and colorize Nunn Design 2-Part Resin with Castin’ Crafts Opaque Pigments
- How to use Nunn Design Transfer Sheets
- How to embed Transfer Sheets into Resin
Fast & Long Video Tutorials!
Watch this Fast Video For a quick overview of the technique!
Watch the full tutorial video where I walk you through the whole process.
Learn How!
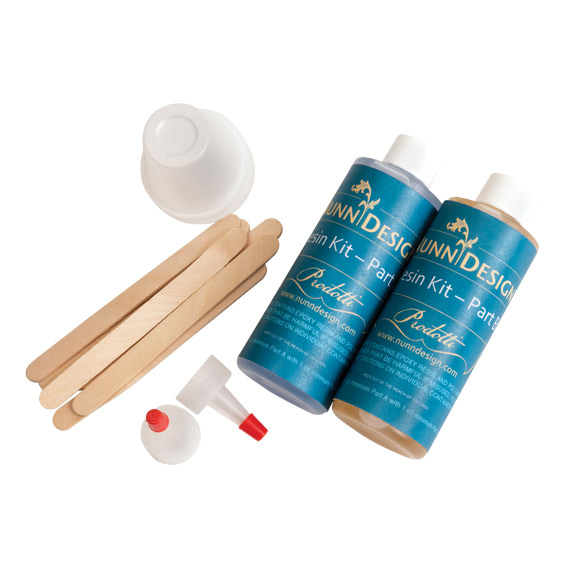
Supplies:
Nunn Design Bezels
Nunn Design Resin Kit
Castin’ Crafts Opaque Pigments – White
Transfer Sheet
Other Supplies Needed:
Q-Tips
Rubbing Alcohol
Packing Tape
Wet wipes
Toothpicks or headpins
Gloves
Timer
Glossy business cards or card stock
Plastic bag for work surface
Goo Be Gone
Tools Needed:
Scissors
Preparing Your Nunn Design Bezels:

Step 1. The Nunn Design Findings are oxidized to provide the aged look to the precious metal plating. The oxidization, when it comes into contact with the mixed Nunn Design Resin could change the color of the resin. To avoid this, clean the findings thoroughly prior to applying the resin. Get the tip of a Q-Tip wet with rubbing alcohol and clean away any of the blackened oxidization on all the surfaces of the bezel.
Step 2. Prior to putting the tape on the back of the open back bezel and filling the bezel with resin, use a pair of scissors to trim one of the images from the Nunn Design Black & White Bird Transfer Sheets. Continue trimming and adjusting until the transfer sheet image fits nicely into your open bezel. You can even use the bezels themselves as templates. Once the transfer sheet is trimmed, set aside for step 13.


Step 3. To create a solid backing for the Nunn Design Open Back Bezel that we are using in this tutorial, cut a piece of packing tape and place it on your work surface. Place the open back bezel onto the tape. To make sure the tape is burnished down and fully attached, use your fingertips to press the bezel down onto the packing tape and rub back and forth on your work surface. If it isn’t fully attached, the resin will seep out from underneath the sidewalls of the bezel.

Tip: Check to see that your packing tape is clear and there is no residue or mottling in the adhesive. If there is, it will show up in your finished resin piece when you remove the tape once the resin is cured. Try to use an area of the tape that does not have blotches or marks. If you are curious on other tape options, you might be interested in reading this blog post. Make sure to read the comments for other great suggestions from other resin artists!
Step 4. Trim away any excess packing tape from around your open back bezel to avoid the curing resin piece from being potentially disturbed.

Tip: I like to place each bezel on its own individual piece of packing tape. It makes the pouring easier to manage and eliminates the chance of disturbing the bezel next to it.
Step 5. I tend to work in a small area (typically my kitchen table), so I like to work on a surface that projects can be easily moved around and not disturbed. Place some business cards or some heavy card stock onto your work surface, making it easy to move the pendants without getting any resin on your fingers.

Tip: I would recommend covering the card with glossy packing tape. This will prevent the resin from sticking to the paper.
Mixing Nunn Design Resin:
Step 6. Read the resin instructions for safety concerns regarding the Nunn Design Resin.
When I work with resin, I always:
- Have my room heated around 70-73°
- Place a large plastic bag over my work surface and tape it down
- Make sure I have ventilation in my workroom
- Wear gloves
- Wear glasses (readers because I can’t see anymore. Plus it protects my eyes!)
- Have a pile of wet wipes handy
This is a great blog post that covers 20 Habits for Successfully Using Nunn Design 2-Part Epoxy Resin. Even if you are a seasoned resin mixer, this might be worth a read.
Step 7. Place one cup (included in the Nunn Design Resin Kit) onto your table. For curing purposes, it is very important that the resin be an exact 1 to 1 ratio of Part A and Part B. I suggest getting your eyes level with the resin so you can see the lines on the measuring cup.
Pour Part A of your resin kit up to the 1 TBS mark on your measuring cup.

Pour Part B of your resin kit into the same cup until it is filled to the 2 TBS mark.
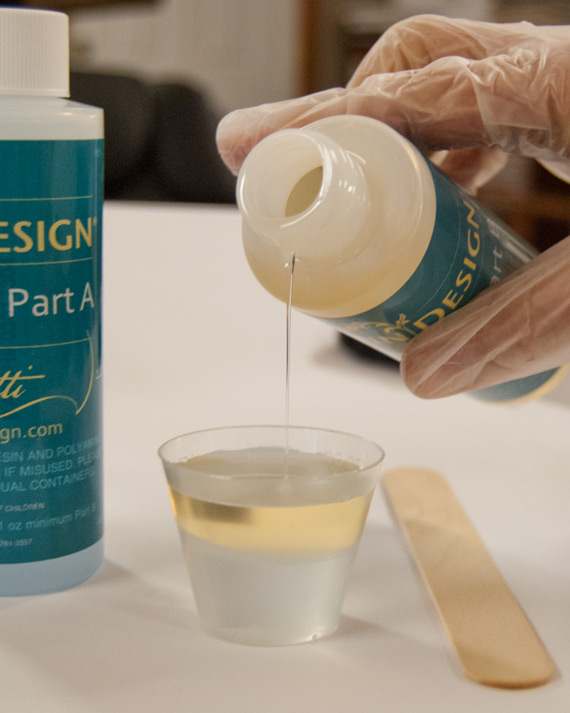
It is important to pour Part A first and then Part B. It is some chemical thing about part A being heavier or something.
Step 8. Set your timer for 2 minutes. Using the stir stick from your kit (a popsicle stick or coffee stir stick will work great too), slowly and carefully stir your resin scraping the sides as you stir. Stir for a minimum of 2 minutes. If your resin is still cloudy continue to mix until clear.
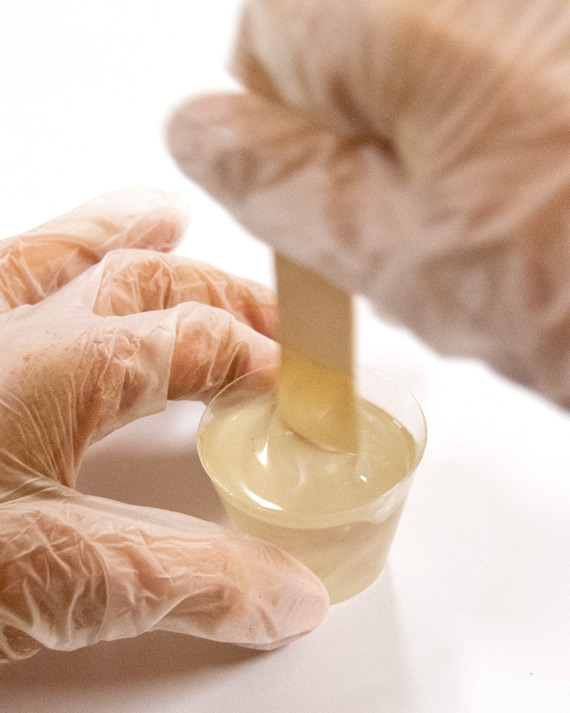
After mixing is complete and your resin is clear, scrape both sides of your stir stick on the edge of your resin filled cup.
Colorizing the Nunn Design Resin:

Step 9. For this tutorial, we are only using Castin’ Craft Opaque Pigment – White to colorize the Nunn Design Resin. To create 2017, 2018 and 2019 Pantone Colors, take a look at these blog posts for the color mixing formulas:
- 2017 Pantone Color Formulas using Nunn Design 2-Part Resin and Opaque Pigments
- 2018 Pantone Color Formulas using Nunn Design 2-Part Resin and Opaque Pigments
- 2019 Pantone Color Formulas using Nunn Design 2-Part Resin and Opaque Pigments
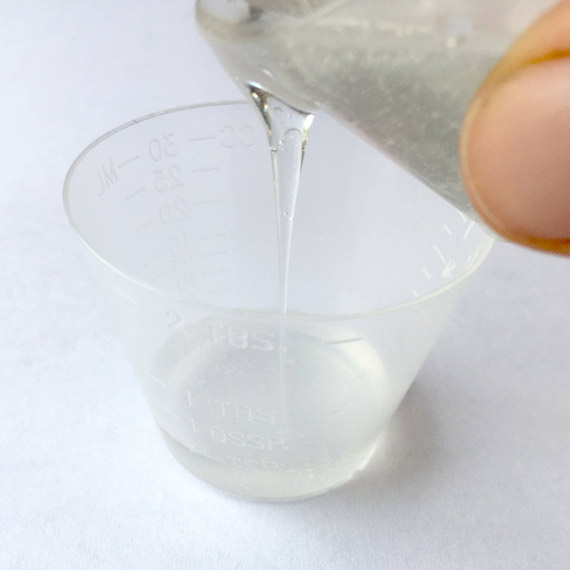
Step 10. To colorize the resin, place another empty resin mixing cup onto your work area. Pour the clear, mixed resin into the cup, filling it to the 1 TSP mark.
Step 11. Add 2 large toothpicks worth of the Castin’ Craft Opaque Pigment – White colorant into the clear mixed Nunn Design Resin. Fully mix the colorant and resin until blended. You will want the colorant to be very translucent so that you can fully see the transfer sheet image once emerged into the resin. If you want the color to be even more opaque, add more of the Castin’ Craft Opaque Pigment – White. If you added too much, just dilute the color with some more clear resin.

Tip: Be sure that the colorant does not equal more than 10% of your resin as having more than 10% could cause issues with curing.
Step 12. Drizzle a small amount of colorized resin into the base of the cleaned Open Back Bezel. Using a toothpick, agitate the resin along the base of the bezel’s sidewalls. Agitating the resin will help dislodge any air bubbles lurking below the surface. Continue to drizzle the colorized white resin until the bezel is about 1/2 full.


Step 13. Now we are ready to apply the transfer sheet into the colorized resin.
Fill a small shallow dish with warm water approximately 3⁄4 of the way full. The Nunn Design Transfer Sheets are printed on a film with a paper backing. When the transfer sheet is submerged into water, it separates the film front from the paper backing. Drop your trimmed transfer sheets into the water and wait 30 seconds. I like to work with one of my transfer sheet images at a time, so I’m not in a rush as all of the backs release from the film fronts at the same time.

Step 14. The film is very fragile, so be gentle when handling it. When removing the transfer sheet from the water, you will be able to feel the film and paper-backing slide apart from one another when you hold them in your fingers. Leave the paper backing attached to the film front and dry your fingers with a paper towel.


Step 15. Slide the transfer sheet up slightly so one of the ends of the transfer film is exposed without the paper backing. With a toothpick, hold the transfer film down in the resin and pull the transfer film image away from the paper backing. Use the toothpick to press the film down into the resin, agitating any air bubbles that might have been trapped under the film. For this first bezel, I pushed the image all the way to the bottom, knowing that the “tape” side of the bezel would be the front. The other three bezels I added the transfer sheet onto the “top,” so more colorized resin was placed into the bezel prior to adding the transfer sheet image.

Step 16. Continue to drizzle additional colorized resin into the bezel. Depending on the look you would like, you can pour enough resin so that the surface is flat and even to the bezel sidewall or you can continue to pour additional resin until the resin is highly domed.


Step 17. If you see bubbles rising to the surface, using your hot breath, breathe on them. It isn’t a “blow” sort of breath – more of a “huff” sort of breath. The hot air will make the bubbles expand, rise to the surface and pop. As the resin starts to set up and become thicker, it will be more difficult for the air to rise to the surface. Make sure to check in on the curing resin and double check for air bubbles. If you do have some bubbles that won’t pop with your “huff,” use a toothpick to gently drag them over to the sides. This agitation process will help them to pop. When the resin is thick and taffy-like in texture it is time to let it be. If you attempt to pop bubbles at this time, you may end up with a gooey mess.
Step 18. If you have resin that has over-poured or seeped under the bezel and onto the card, wait about 6 hours until the resin is at its “soft cure” phase. Remove the bezel from the card. The resin will still be soft. Use a pair of needle nose pliers to bend back the resin from the bezel. The resin will easily separate and peel off of the bezel.
Step 19. Let the resin cure for 12-14 hours. The resin will be hard to the touch but will continue to cure for the next 72 hours. Place a small plastic container over the bezels to prevent dust from getting into the resin as it cures.

Step 20. Remove the packing tape from the backside once fully cured. If you do it after 12 hours the resin will still be very flexible and can easily “bow” within the bezel. Just go slow and don’t press or pull too hard.

Step 21. If you have any excess residue from the packing tape on the backside, use the tape to remove it like you would when you are removing lint or animal fur from your clothes. Keep touching the packing tape onto the sticky surface until it is no longer sticky. Still sticky, try Goo Be Gone! Follow the manufacturer’s instructions for best results.


I applied a couple of drops on the backside and let it sit for over a minute. I then used a stir stick to scrape the tape’s residue. It was fast and easy. Once clean, just use rubbing alcohol or a wet-wipe to wipe clean.


Ideas For Excess Resin!
If you are stressing because of the waste, here are a couple of tutorials that are ideal for resin that is getting very thick and goopy.
- Colorized Resin Gems Tutorial
- Texturized Resin in Open Frame Hoops Tutorial + Video
- Making Molds with Organics to Create Sculpted Resin Tutorial + Video
- Nunn Design Resin Drop Pendants using Excess Resin and Gilding Flakes
Learn How With Videos!
Here are two videos we did with Fusionbeads.com on preparing Nunn Design 2-Part Resin, and colorizing it!
- How to Prepare and Mix Nunn Design Resin with Becky Nunn | Fusion Beads
- How to Colorize Nunn Design Resin with Pigments with Becky Nunn | Fusion Beads
Shop Wholesale Nunn Design Findings
Shop Nunn Design Wholesale
Nunn Design has been supplying jewelry artists with findings for over 20 years. Shop wholesale jewelry findings for creative jewelry makers.
Shop Nunn Design!How to Purchase Wholesale?
If you are interested in becoming one of the many designers who trust their jewelry to Nunn Design Findings, please join us by registering to become one of our wholesale customers!
Please visit our Where to Buy Page for a listing of online stores that sell Nunn Design Findings retail.

If you enjoyed reading this post, please subscribe to our blog. Here are 10 Reasons Why to Subscribe and a place to do so!