


Dried Flowers & Resin, Nunn Design Online Classes, Tutorials
Organics & Nunn Design 2-Part Resin in Open Back Hoops


Using an open back hoop as opposed to a bezel is a fun way to create organic resin jewelry. In this tutorial you will learn:
- How and why to clean your Nunn Design Open Back Hoops
- How to preserve and prepare flowers and organics for floral resin jewelry
- How to flatten the Open Back Hoops and apply tape onto the backside to use with Nunn Design 2-Part Resin
- How to mix Nunn Design 2-Part Resin
- How to colorize Nunn Design 2-Part Resin with Castin’ Craft Opaque Pigments
- How to apply dried flowers, clear and colorized resin into Open Back Hoops
- How to babysit your curing resin
- How to clean-up resin overflows
- How to remove and clean the tape off of the cured resin
- How to address dried flowers protruding out of the resin surface
- How to apply a hinged bail
- What to do with excess resin
Fast Tutorial Video:
Watch this Fast Video For a quick overview of the process and then read the full tutorial below!
Long Tutorial Video:
Watch the Long Video to see the complete process!
Learn How!
Supplies :
Nunn Design Hoops
Nunn Design Resin Kit
Castin’ Craft Opaque Pigment-White
Bail Hinges Loop
GS Hypo Cement Glue or E6000 Glue
Dried organics
0000 Fine Steel Wool
Other Supplies Needed:
Q-Tips
Rubbing Alcohol
Packing Tape
Wet wipes
Toothpicks
Baby Powder
Gloves
Timer
Glossy business cards or card stock
Plastic Bags, such as a Ziploc Bag
Goo Be Gone
Tools Needed:
Tweezers
Scissors
Needle Nose Pliers
How and Why to Clean Your Nunn Design Bezels

Step 1. The Nunn Design Findings are oxidized to provide the aged look to the precious metal plating. The oxidation, when it comes into contact with the Crystal Clay could change the color of the clay. To avoid this, clean the findings thoroughly prior to applying the clay. Get the tip of a Q-Tip wet with rubbing alcohol and clean away any of the blackened oxidation on both sides of the bezels.
Learn more here on How and Why it is Important to Clean Nunn Design Bezels.
How to Preserve and Prepare Flowers and Organics for Floral Resin Jewelry

The preparation process of your flowers and organics is a critical part to successfully creating floral resin jewelry. If the flowers and organics are not preserved and prepared properly, you will likely experience discoloration in your flowers and bubbles in the resin.
How to Preserve Flowers and Organics
Step 2: To preserve and prepare 2-dimensional flowers and organics to be embedded into the colorized Crystal Clay and layered into colorized Nunn Design Resin, pressing your flowers and organics within a flower press, book or catalogue will provide the best results.
Here are some basic steps to preserving your own flowers and organics:
- Pick organics and press them while they are fresh
- If you would like to use a floral press, you can buy one or make one. Other inexpensive alternatives are to use books or a catalogue. I personally think that an old catalogue destined to be recycled is the best choice.
- Place the flowers and organic in between two sheets of paper and insert the paper in between the press, book or catalogue pages. Allow a good 1/8” of book pages in between the organics so as to not disturb the various layers. If you are using a book or catalogue, place additional books on top of the book with your flowers or organics to provide additional weight.
- Pressing flowers using a press, book or catalogue will take 2-3 weeks to fully dry. TIP: If you aren’t able to press right away, place the organics in a zip-lock bag and place in the refrigerator until you can press them.
How to Prepare Flowers and Organics for Resin
Step 3: Some dried and pressed flowers will become totally translucent when exposed to the resin. Resin spray is a very fast drying, easy to apply aerosol that will seal the organics. The extra coat of sealant from the resin spray will prevent the resin from absorbing into the organics.
Here are some basic steps for preparing your flowers and organics to be placed in resin:
- Place dried and pressed flowers in a cardboard box with high sidewalls and head outside when it is time to spray.
- Spray the dried and pressed flowers on one side, then turn over and spray the other side.
- To purchase the resin spray (sorry, it is expensive for us to ship this, so we don’t offer it on our website) this vendor has the resin spray and offers free shipping on Amazon.
- If you don’t want to purchase and use the resin spray, you can have some extra dried and pressed flowers at the ready in case the flowers that you wanted to use become translucent and aren’t working for you. Because there are a gazillion options for flowers (well, maybe not that many) it is way too difficult to know what will work for sure and what won’t. You will have to experiment.
Learn more here on How to Preserve and Prepare Organics for Floral Resin Jewelry.
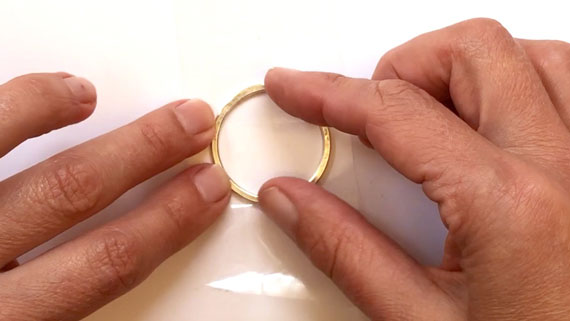
How to Flatten the Open Back Hoops and Apply Tape onto the Backside to use with Nunn Design Resin.

Step 4: Make sure that your Nunn Design Hoop lays flat onto the surface of your work surface. During the manufacturing process, it is easy for cast pewter items to become slightly bent. Take a moment to double-check that all of the hoop is level to the work surface. If it is not level, press down and slightly bend the hoop using your fingertips until it is level.
Step 5: To create a solid backing for the Nunn Design Hoop that we are using in this tutorial, cut a piece of packing tape and place it on your work surface. Place the Open Back Hoop onto the tape. To make sure the tape is burnished down and fully attached, use your fingertips to press the bezel down onto the packing tape and rub back and forth on your work surface. If it isn’t fully attached, the resin will seep out from underneath the sidewalls of the bezel.
Tip: Check to see that your packing tape is clear and there is no residue or mottling in the adhesive. If there is, it will show up in your finished resin piece when you remove the tape once the resin is cured. Try to use an area of the tape that does not have blotches or marks. If you are curious about other tape options, you might be interested in reading this blog post. Make sure to read the comments for other great suggestions from other resin artists!
Step 6: Trim away any excess packing tape from around your open back hoop to avoid the curing resin piece from potentially being disturbed.

Tip: I like to place each hoop on its own individual piece of packing tape. It makes pouring resin easier to manage and eliminates the chance of disturbing the hoop next to it.
Step 7: I tend to work in a small area (typically my kitchen table), so I like to work on a surface that projects can be easily moved around and not disturbed. Place some business cards or some heavy card stock onto your work surface, making it easy to move the pendants without getting any resin on your fingers.

Tip: I would recommend covering the card with glossy packing tape. This will prevent the resin from sticking to the paper.
How to Mix Nunn Design 2-Part Resin
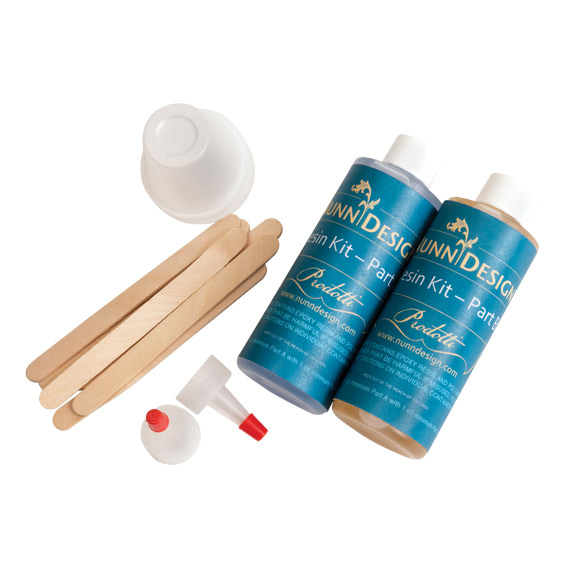
The Nunn Design Resin Kit contains:
A 4-ounce bottle of clear epoxy resin
A 4-ounce bottle of epoxy hardener
2 precision tips to screw onto the bottles
5 mixing cups
5 mixing sticks
Printed instructions on how to mix the resin
Step 8: Read the resin instructions for safety concerns regarding the Nunn Design Resin. Put on your latex gloves and I would recommend safety glasses. I wear readers so I think that my eyes are protected. Make sure you have a pile of wet-wipes on the ready!
Step 9: To mix the resin you’ll want to have an exact one-to-one ratio. The one-to-one ratio has to be one tablespoon of Part A first and one tablespoon of Part B. This is a volume thing, not a weight thing. You have to mix the full mixing cup of resin to have the resin properly activate. I thought this was an excuse to get me to use more resin, but trust me, it isn’t! It is important to pour Part A first into the cup and then Part B. It is a chemical thing about part A being heavier or something.
Place one of the mixing cups included in the Nunn Design Resin Kit onto your table. I suggest getting your eyes level with the resin so you can see the lines on the measuring cup. Remove the lid to Part A of your resin kit and slowly pour the resin into the mixing cup up to the 1 Tablespoon mark. I suggest that you go slow until you start to gain more confidence. When you start to get near the 1 Tablespoon line, tilt the Part A bottle down, slowing the flow of the resin. Slowly drizzle the resin into the cup until you have hit the 1 Tablespoon mark EXACTLY! To end the flow of the resin, twist the bottle. Use a wet-wipe to fully clean up resin from the edge of the bottle. Make sure to put the Part A lid back onto the resin bottle.
I fold my wet-wipe over to make sure I don’t contaminate Part B when I clean up the edge of that resin after I pour it. I am also making sure that I don’t get any of the resin onto my hands.
Following all the same steps used for Part A, pour Part B into the mixing cup until it is EXACTLY at the 2 Tablespoon mark. Clean up the edge of the resin bottle and securely twist the Part B cap back onto the resin.
Step 10: Set your timer for 2 minutes. Using the stir stick from your Nunn Design Resin Kit, slowly and carefully stir your resin scraping the bottom of the cup and the sidewalls as you stir. Go slowly because it is easy for the cup to overflow. I hold the cup down at the base and use my fingers to help rotate the cup around. Stop from time to time and scrape the resin from the sides of the stir stick and continue to stir for the full 2 minutes. If your resin is still cloudy after your timer has gone off, continue to mix until clear.

After mixing is complete and your resin is clear, scrape both sides of your stir stick on the edge of your resin filled cup.
Another habit that I have developed, is being aware of where I rest my stir sticks. To avoid getting resin all over my work surface, I like to rest the resin stir sticks in one of the mixing cups or onto a small Ziploc. I can easily peel the resin off of the Ziploc and reuse it. I can also reuse my stir stick once the resin has fully cured. I do know people who wipe out and reuse their mixing cups, but I haven’t done that so I cannot recommend it.
How to Colorize Nunn Design 2-Part Resin with Castin’ Craft Opaque Pigments

Step 11: For this tutorial, we are going to colorize the mixed Nunn Design resin with the white Castin’ Craft Opaque Pigment. Place an empty resin mixing cup onto your work area. Pour the clear, mixed resin into the cup, filling it to the 1 TSP (you may need more of the full TBS mixed, but you can easily colorize more).

Step 12: Add a light squirt of the Castin’ Craft Opaque Pigment – White colorant into the clear mixed Nunn Design Resin and mix fully until blended. If you want the color to be even more opaque, add more of the Castin’ Craft Opaque Pigment – White.


Tip: Be sure that the colorant does not equal more than 10% of your resin as having more than 10% could cause issues with curing.
How to Apply Dried Flower, Clear, and Colorized Resin into Open Back Hoops

Step 13: Lay the Nunn Design Hoops onto your work surface. Spend a moment to design and select the dried flowers and organics that will create the nicest design/composition within the various sizes of the Open Back Hoops. If the dried flowers and organics are too large or long, use a pair of flush cutters or scissors to resize.

Step 14: It is time to apply the clear and colorized resin to create this awesome look! There is no right way to do this and each piece created will be unique.
Step 15: Using a toothpick or narrow resin stir stick, drizzle a small amount of colorized resin into the base of the hoop. Take a couple of moments to agitate the resin, making sure that there aren’t any air bubbles trapped along the edges of the hoop. If you have bubbles that rise to the surface, use your hot breath to “huff” on the resin. The heat from your breath will make the bubbles expand and pop.


TIP: Use multiple toothpicks; one to move the resin around inside of the bezel and one to hold the bezel in place. I try to keep my hands away from the resin, especially as more and more resin is applied and a higher dome of resin is created. This tip will help to not disturb the resin and prevent the resin from over pouring.
Step 16: Drizzle clear resin onto a plastic bag. Place the organics into the resin and coat on both sides.


Step 17: Drizzle some of the clear resin into the Open Frame Hoop. This will allow for the organics to not become lost in the colorized resin once placed within the resin.

Step 18: Place the organics into the colorized resin inside of the hoop using a couple of toothpicks or a mixing stick (the thick ones from the resin kit). Gently move the organics into the desired position.

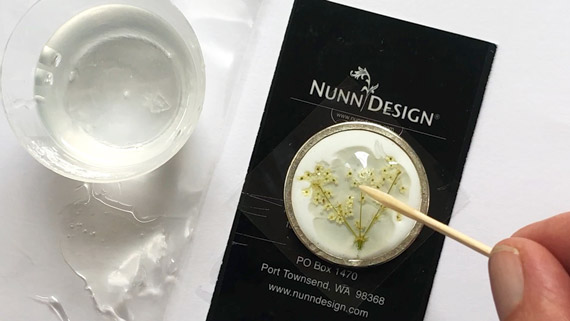
Step 19: Use a toothpick to swirl the white colorized resin around the organic, creating an interesting effect and design. If the white colorized resin starts to cover up the organics, drizzle clear resin over the organics to push the white colorized resin to the side.

Step 20: Use your toothpick to move the resin out to the edges of the Open Back Hoop. This will allow for a consistent edge and finish to your resin design.
Step 21: Drizzle more clear resin onto the surface of the organics until the Open Back Hoop is slightly domed.
How to Babysit Your Curing Resin
Step 22: During the first 1-2 hours, watch closely to see if the flowers are rising and protruding out of the surface of the resin and for air bubbles. If the flowers are rising to the surface and protruding, use a toothpick to press the flowers back down into the resin. Continue to use your hot breath to “huff” on the pieces to pop the air bubbles. As the resin starts to set-up, let it go.
Let the resin cure for 12-14 hours in a dust-free environment. If the flowers are protruding or if you have dust, we will address that later once the resin has cured.
How to Clean Up Resin Overflows
Step 23: If you have resin that has over-poured or seeped under the Open Back Hoop and onto the card, wait about 12-18 hours until the resin is at its “soft cure” phase. Remove the hoop from the card. The resin will still be non-tacky but still flexible. Use a pair of needle-nose pliers to bend back the resin from the hoop. The resin will easily separate and peel off of the hoop.
TIP: It may take longer than 12-18 hours depending on your room temperature. You will want the resin to be firm, but not super hard.
How to Remove and Clean the Tape Off of the Cured Resin

Step 24: To finish your Open Hoop, remove the packing tape from the backside once fully cured. If you have any excess residue from the packing tape on the backside of the resin, use the tape to remove it like you would when you are removing lint or animal fur from your clothes. Keep touching the packing tape onto the sticky surface until it is no longer sticky.

Step 25: If the residue isn’t coming up, try Goo Be Gone! Follow the manufacturer’s instructions for the best results. I applied a couple of drops on the backside and let it sit for over a minute. I then used a stir stick to scrape the tape residue. To remove all that sticky mess, pour some rubbing alcohol onto a wet-wipe and wipe it away.


How to Address Dried Flowers Protruding Out of the Resin Surface
Step 26: There is a high chance that the dried flowers or organics can protrude out of the resin surface. If this is the case you can mix another batch of Nunn Design Resin and apply a second coat to the surface.
TIP: You could also use a piece of steel wool to lightly sand the surface. To create a high gloss finish once again, apply Castin’ Craft Resin Spray over the surface of the sanded resin.

Step 27: Let the resin cure for 12-14 hours. It will be hard to the touch, but resin continues to cure for the next 72 hours. Place a small plastic container over the bezels to prevent dust from getting into the resin as it cures.
How to Apply a Hinged Bail
Step 28: Once the piece is cured, use a little GS Hypo Cement or E6000 to glue on the bail. Apply a dab of glue of choice onto the backside of the Bailed Hinge. Place the hinge onto the resin and let dry for 2 hours.


What to Do with Excess Resin!
If you are stressing because of the waste, here are a couple of tutorials that are ideal for the resin that is getting very thick and goopy.
- Colorized Resin Gems Tutorial
- Texturized Resin in Open Frame Hoops Tutorial + Video
- Making Molds with Organics to Create Sculpted Resin Tutorial + Video
- Nunn Design Resin Drop Pendants using Excess Resin and Gilding Flakes
Shop Supplies:
Shop Supplies Wholesale:
Shop Nunn Design Wholesale
Nunn Design has been supplying jewelry artists with findings for over 20 years. Shop wholesale jewelry findings for creative jewelry makers.
Shop Nunn Design!How to Purchase Wholesale?
If you are interested in becoming one of the many designers who trust their jewelry to Nunn Design Findings, please join us by registering to become one of our wholesale customers!
Please visit our Where to Buy Page for a listing of online stores that sell Nunn Design Findings retail.

If you enjoyed reading this post, please subscribe to our blog. Here are 10 Reasons Why to Subscribe and a place to do so!